
|
Lesson 3 – CRM – Calendar In this lesson, you are going to learn about the Calendar in MRSware. You will use the calendar to schedule and track appointments in your MRSware system. You can see your appointments, uncompleted tasks, birthdays and holidays as well as appointments entered by other MRSware calendar users. Calendar appointments help build your Relationship Database, mentioned in the Lessons 1 and 2. The Contact Printout shows your past appointments as well as meetings scheduled for the future. |
A shared calendar, like all Customer Relationship Management (CRM) modules, provides better information flow within the company, allowing someone else in your company to schedule meetings for you if you are free. You will also know if a specialist is available to make a call with you at a particular day and time. This creates enhanced collaboration and superior customer service and saves time, improving efficiencies and productivity.
Today, you are going to go through each section in Calendar, learn how to add a new appointment to your system, how to invite others to join you in your meeting, how to set reminders for your meeting, how to set up a recurring appointment, how to color code your appointments and how to add and edit information to the appointments already in your system. You will also learn how to see if other calendar users are available to join you in a meeting.
Today, you are going to go through each section in Calendar, learn how to add a new appointment to your system, how to invite others to join you in your meeting, how to set reminders for your meeting, how to set up a recurring appointment, how to color code your appointments and how to add and edit information to the appointments already in your system. You will also learn how to see if other calendar users are available to join you in a meeting.
Chapter 1
Calendar
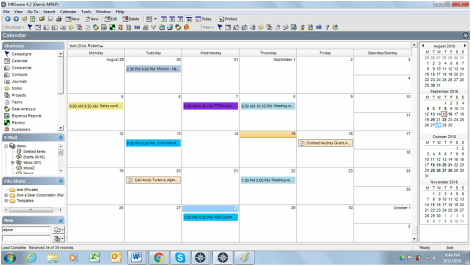
The calendar contains all the meetings, events, trade shows, conventions, conferences, birthdays and holidays entered in your company’s MRSware system. You can also enter private appointments seen only in your calendar.
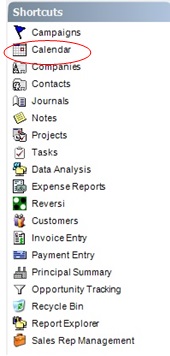
Login to MRSware now. Once MRSware is open, click on Calendar in the Shortcuts panel or click on the Calendar icon on the Shortcuts Toolbar.
Calendar Menu bar, Toolbar, and Calendar bar
Calendar
The calendar contains all the meetings, events, trade shows, conventions, conferences, birthdays and holidays entered in your company’s MRSware system. You can also enter private appointments seen only in your calendar.
Login to MRSware now. Once MRSware is open, click on Calendar in the Shortcuts panel or click on the Calendar icon on the Shortcuts Toolbar.
Calendar Menu bar, Toolbar, and Calendar bar

When Calendar opens, look at the Menu bar and the main Toolbar. Notice the changes in the options available on the Menu and Toolbars from the options available in Companies and Contacts.
The Calendar Toolbar has several new buttons available. Move your cursor over each icon to see what their function is. Then click on each of the new buttons available to you.
Did you notice you can add a new Appointment or a new Task?
Did you notice the Printout button?
To use the Printout tool:
1. Highlight a specific appointment
2. Click on the Printout button.
3. When the Report Prompt for Appointment Printout dialog box opens, make sure the correct appointment is highlighted.
4. Click Ok.
5. The Report opens in the default .pdf format
The Report encapsulates all the information found in the Edit Appointment window on one page. If you have a sales meeting or training session, any notes or agenda you have entered in your Appointment can be a handy reminder during your event.
Did you notice the numbers 1, 5, 7 or 31, and Today? These buttons change the Calendar view.
|
|
|
|
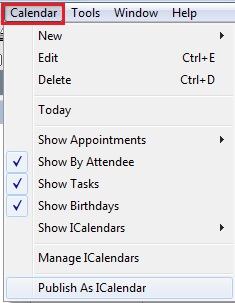
The Menu bar has one new Menu option – Calendar. Click on Calendar to see the options available to you in this Menu. Show by Attendee when checked allows you to view public appointments or tasks entered into the system by other MRSware calendar users. |
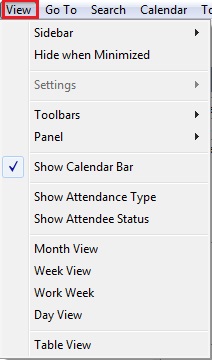
The View menu has several new options. Click View to see the options available to you. You can change your Calendar view by going to View and selecting your preferred view. |
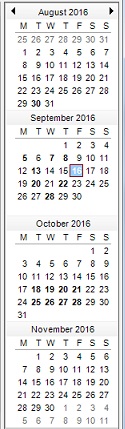
The Calendar bar is located to the right side of the Calendar screen. The Calendar bar allows you to move easily through months past or in the future. The Calendar bar always displays four months. To move to the next month, click on the right facing arrow at the top of the Calendar bar. To move back to the previous month, click on the left facing arrow at the top of the Calendar bar. To add a new appointment in the future, click on the date in the Calendar bar and the Add/Edit Calendar window will open. |
Chapter 2
Calendar Views
There are four ways to view Calendar.
Calendar Views
There are four ways to view Calendar.
- Day View will show you a single day with 30 minute intervals
- Work Week View will show you Monday through Friday with 30 minute intervals
- Week View will show you Monday through Sunday
- Month View will show you 5 weeks at a time
|
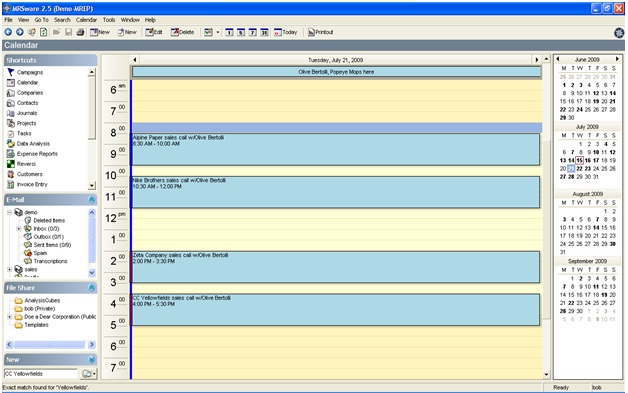
Day View
Click on the number 1 on the Button bar to display your calendar in the Day View. As you can see, the Day View shows half hour increments from 12:00AM through 11:30PM. Displayed at the top of each day are tasks to be completed, any all day appointments or holidays. To move ahead to the next day, click on the right facing arrow on the right side of the date. To move back to the previous day, click on the left facing arrow on the left side of the date. Use the scroll bar to the right of the calendar to move up and down through the hours of the day. If you want to see the details of a specific appointment, double click on the appointment or right-click and select Edit. |
|
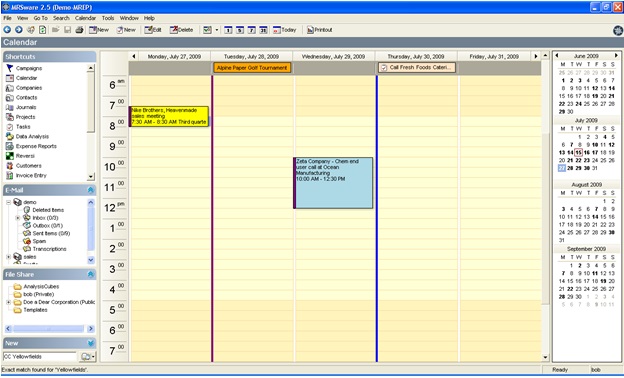
Work Week View
Click on the number 5 to see the Work Week View . As you can see, the 5 day or Work Week View also shows half hour increments from 12:00AM through 11:30PM. Displayed at the top of each day are tasks to be completed and any all day appointments. To move ahead to the next week, click on the right facing arrow on the right side of the dates. To move back to the previous day, click on the left facing arrow on the left side of the dates. Use the scroll bar to the right of the calendar to move up and down through the hours of the day. If you want to see the details of a specific appointment, double click on the appointment or right-click and select Edit. |
|
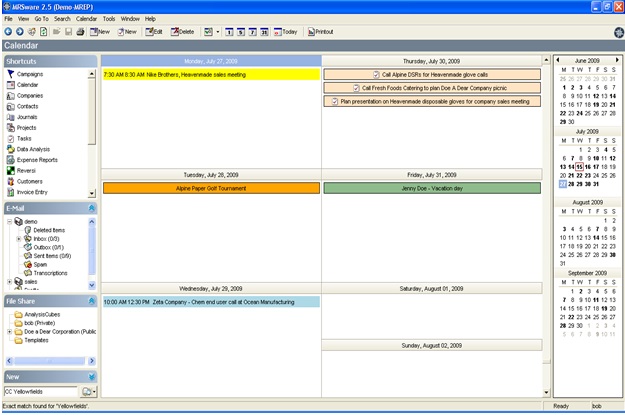
Week View
Click on the number 7 to see the Week View. The 7 day or Week View does not display hours of the day. It only displays the scheduled events you have in your calendar. Like the 1 day and 5 day views, tasks appear at the top of your list along with all day events and holidays. The scheduled time displays on the left side of each individual appointment. To move ahead to the next week or back to the previous week, use the scroll bar on the right side of the calendar. If you want to see the details of a specific appointment, double click on the appointment or right-click and select Edit. |
|
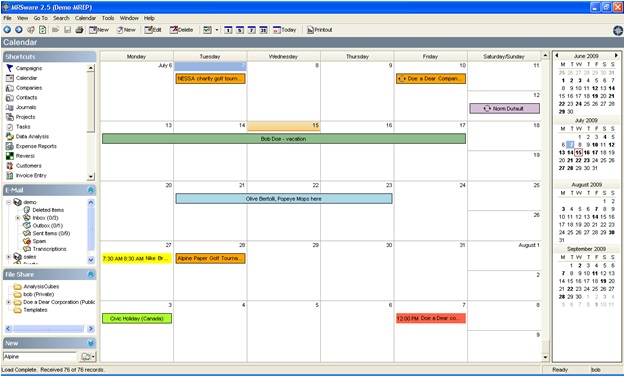
Month View
Click on the number 31 to see the Month View. Like the 7 day or Week View, the Month View displays your events in boxes over a 31 day period. There are always 5 weeks displayed on the screen. To move ahead to future weeks or back to previous weeks, use the scroll bar on the right side of the calendar. You can also use the Calendar bar on the right side of the screen to move to another month and day. To do this, click on the day you want to see and your calendar will display this day or week, depending on the view you are showing. If you want to see the details of a specific appointment, double click on the appointment or right-click and select Edit. |
|
i If you see a downward facing arrow in the right hand bottom corner of any Calendar day, it indicates more appointments are scheduled, but there is not room to display them all in the present Calendar view.
In order to view all the events scheduled for the day, click on the arrow and it will open to the Day View displaying all appointments for that one day. |
|
Chapter 3
Edit Appointment/Add Appointment
There are two types of Appointment windows.
1 – An appointment already in your system – Edit Appointment
2 – A blank appointment – Add Appointment
Edit Appointment
Edit Appointment is an appointment window containing information that is already in your system. You access this window when you want to add to or change the information found within the current appointment.
To access a current appointment or the Edit Appointment window:
1 - Click on Calendar found in the Shortcuts Panel or the Calendar icon on the Shortcuts Tool or Button bar.
2 - When the calendar opens, double click on one of your scheduled appointments or right click and select Edit and the Edit Appointment window will open.
Here’s an example of how to edit a current appointment:
|
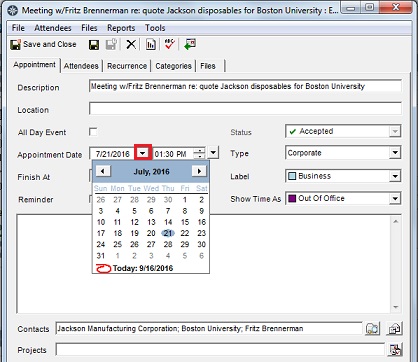
Variety Supplies has changed the day it scheduled an end user call with Fritz Brennerman at Boston University from July 21 to July 22, therefore you need to edit the appointment window. 1 - Click on Calendar in the Shortcuts Panel or the Calendar icon in the Shortcuts Tool bar. 2 - Go to July 21 and double click on the Meeting w/Fritz Brennerman re:quote Jackson disposables for Boston University appointment 3 - The window titled Meeting w/Fritz Brennerman re:quote Jackson disposables for Boston University will open. 4 – Click on the down arrow next to Appointment Date and select July 22 or click on the number 21 in the Appointment Date and type in 22. Open and change an Edit Appointment window, using an appointment already scheduled in your system. |
Add Appointment
The Add Appointment window is a blank appointment window waiting for you to schedule a new appointment in your system.
There are seven ways to open an Add Appointment window:
The Add Appointment window is a blank appointment window waiting for you to schedule a new appointment in your system.
There are seven ways to open an Add Appointment window:
|
Option 1 - 1 - Click on Appointment in the New Panel in the Sidebar. 2 - The Add Appointment window opens. |

|
|
Option 2 – 1 – Click on Create Appointment icon on the New Toolbar. 2 – The Add Appointment window opens. |

|
|
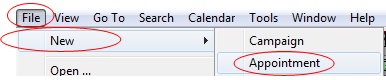
Option 3 – 1 – On the Menu bar, click on File -> New -> Appointment. 2 – The Add Appointment window opens. |
|
|
Option 4 – 1 – Click on Calendar in the Shortcuts panel. 2 – Click on the New calendar icon on the main Toolbar. 3 – The Add Appointment window opens. |
|
|
Option 5 –
1 – Click on the Calendar icon on the Shortcuts Toolbar. 2 – Click on the New calendar icon on the main Toolbar. 3 – The Add Appointment window opens. |

|
|
i When you click on Calendar in the Shortcuts panel or the calendar icon in either Options 4 or 5, you will need to take a second step and select the New calendar icon on the main Toolbar.
|

|
|
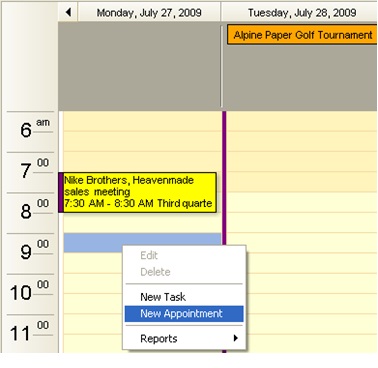
Option 6 -
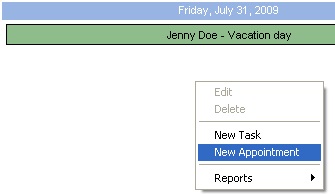
1 - Open your calendar by using either Option 4 or Option 5. 2 - Select your view - 1 Day, Work Week, Week, or Month. 1 Day or Work Week View: 3 - Select either the 1 Day View or the 5 Day View found on the main Toolbar. 4 – Click on the specific time you want to schedule your appointment. 5 – Right click and select New Appointment |
|
|
Option 7 -
1 - Open your calendar by using either Option 4 or Option 5. 2 - Select your view - 1 Day, Work Week, Week, or Month. Work or Month View: 3 - Select either the Work View or the Month View found on the main Toolbar. 4 – Click on the specific time you want to schedule your appointment. 5 – Right click and select New Appointment |
|
Set up a new appointment using all of the options. Did you try all of the Views from Options 4 or 5? If not, try them both now.
Did you notice the difference between the 1 or 5 day New Appointment window and the 7 or 31 day New Appointment window?
What would be different about these windows?
The answer is - the 1 or 5 day screen already has not only the day you selected but also the time you selected filled in. When the Add Appointment window opens, the date and time are automatically entered. The 7 or 31 day screen only has the date you selected filled in. You have to select the time you want to schedule the appointment.
Regardless of the option you choose to open the New Appointment window, the method in which you enter information is the same.
Open and add a new appointment to your calendar. Follow the steps below to enter information.
! TIP:
Don’t forget to hit the Tab key to move from field to field.
1 – Open an Add Appointment window by using one of the options previously discussed.
2 – Click your cursor in the blank Description field.
3 - Type the name of your meeting in the Description field.
4 – Type the place of your meeting in the Location field.
5 - If this meeting is scheduled for the entire day or multiple days, click the All Day box.
6 – Select the Date and Time in the Appointment Date fields.
7 – Select the Date and Time in the Finish At fields.
8 – Select the Type from the drop down list next to Type.
9 – Select the appropriate color from the drop down list next to Label.
10 – Select if you will be free, busy or out of the office for this meeting from the drop down list next to Show Time As.
11 – Check the box and then select a reminder time from the drop down list next to Reminder.
12 - Click on Save and Close.
i If you want to add information to another area within the Appointment window, click on the disc icon (Save) to the right of Save and Close. This will save the information you have entered, but keep the window open for further additions.
Chapter 4
The Calendar Title bar, Menu bar, Toolbar and the Tabs
Up to now, when you edited information or added a new appointment, the main page of the Appointment window displayed. The main page shows general information usually found in a paper calendar or Filofax type notebook. This includes who you’re meeting with, where you’re meeting, the day and time of the meeting, type of meeting along with it’s label color, any reminder you need and whether you’re busy, out of the office or free during this time.
When you’re building a Relationship Database, your appointments provide more information for your Companies and Contacts. You will use the tabs in your appointment windows to see if others in your company are available to join you for this event, if they are available you can invite them. If this appointment is recurring, you can set this up in the window. You can set up groups and attach files you may need for the meeting.

|
Title bar
At the top of any of the Appointment window, you will see the Title bar with the name of the window. For example: Meeting w/Fritz Brennerman re: quote Jackson disposables for Boston University: Edit Appointment. |

|
Menu bar
Under the Title bar, is the Menu bar – the menus from left to right are: File, Attendees, Files, Reports and Tools. Each Menu option has a drop down list which allows you to perform another action. Take the time now to click on each option on the Menu bar and view the drop down lists and the options available to you. |

|
Tool bar
Under the Menu bar, is the Toolbar – the icons from left to right are: Save and Close, Save, Save and New (grayed out), Delete, Appointment Printout (report), Spell Check, and Send as iCalendar. These buttons are short cuts to other windows or dialog boxes within the CRM application. Take the time now to click on each of the icons. Each button will open another window or dialog box allowing you to save time and add more information to your Relationship Database. |

|
Tabs
Under the Tool bar, is a series of tabs. The tabs open to other pages within the Appointment windows. |
Here a a brief description of each of the tabs in the Appointment windows:
Appointment: This tab displays the main page of the Add Appointment or Edit Appointment window. Shown on the main page are the details of the appointment - the name, location, day, time, type, label color, reminder and whether you are free, busy, etc. There is a Notes section in the middle of the page, and at the bottom of the page is the Contacts field and the Projects field, where you link the appointment to contacts and projects in your system.
i MRSware automatically links the names of the contacts and the projects in the Contacts and Projects fields to the contacts and projects. The appointment being linked will appear in the Activity tables of all entered contacts or projects.
Attendees: This tab lists all of the MRSware Users in your company and if they are busy, out of the office or free at the time of this appointment.
Recurrence: Under this tab you have the ability to set up appointments that take place on a regular basis.
Categories: This tab opens to a list, which you create, so you can group appointments for searching and filtering. For example, you may include demos, sales meetings, training sessions, etc. Once you have created your groups, you can use the search function to filter your lists in order to analyze your meetings.
Files: This tab opens to a list of files that are related to the appointment. For example, the files may include quotes or presentations you need for the meeting.
Take the time now to click on each tab in an Appointment window within your system to view the information available.
Chapter 5
Final Thoughts
Now that you can add a new appointment or update a current appointment, you can continue to build your Relationship Database. Shared appointments will increase collaboration in your company, improving your efficiency and productivity.
When you feel you fully understand the information, take the quiz.
Lesson 3 Quiz - CRM - Calendar
This quiz is designed as a multiple choice format. When you have completed the quiz, enter your name and e-mail address, then click Submit Answers. You will receive an e-mail response with the correct answers.
Good luck.
This quiz is designed as a multiple choice format. When you have completed the quiz, enter your name and e-mail address, then click Submit Answers. You will receive an e-mail response with the correct answers.
Good luck.