
You work for a company, it has resources that you make use of and have to share with other members of your company. You can add those resources to MRSware so that they appear in everyone's calendar, can be reserved for events, and everyone can see when a particular resource is available or busy.
Typical resources are things like conference rooms, projectors, and office tools. However, they can also be things like Demo Equipment, especially large pieces that are shared; or even Product Samples or Catalogs that are being distributed on sales calls.
Typical resources are things like conference rooms, projectors, and office tools. However, they can also be things like Demo Equipment, especially large pieces that are shared; or even Product Samples or Catalogs that are being distributed on sales calls.
Schedule that Resource (for the User)
Reserving a resource for your appointment is as simple as going to the Attendees tab and checking the box next to the item(s) you want to reserve.
Reserving a resource for your appointment is as simple as going to the Attendees tab and checking the box next to the item(s) you want to reserve.
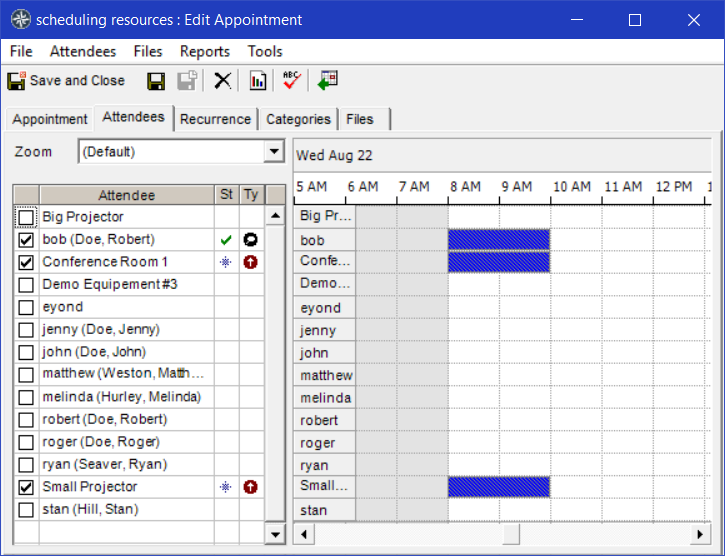 |
Reserved resources will show up as Free / Tentative / Busy / or Out of Office to other Users, as you have the Appointment's "Show Time As" selection set.
Setup that Resource (for the Admin)
In order for the resource(s) you are interested in scheduling to appear in the schedule, you will add them to the Users section of MRSware with the Enabled checkbox unchecked. Disabled Users are not billed for, and if they have the "User" Role in their entry they will appear as resources in the calendar -- they can be invited just like any other User in the system.
As a matter or housekeeping, keeping those lists easy to use, I might suggest adding a preface to your resources so that they appear grouped together in the Attendees list. For example:
In order for the resource(s) you are interested in scheduling to appear in the schedule, you will add them to the Users section of MRSware with the Enabled checkbox unchecked. Disabled Users are not billed for, and if they have the "User" Role in their entry they will appear as resources in the calendar -- they can be invited just like any other User in the system.
As a matter or housekeeping, keeping those lists easy to use, I might suggest adding a preface to your resources so that they appear grouped together in the Attendees list. For example:
- resource - Conference Room 1
- resource - Large Projector
- resource - Small Projector