
|
Lesson 1 - Home Page In this lesson, you are going to get acquainted with the look and feel of MRSware. Our developers designed MRSware to have a familiar look and feel in order for the application to be user friendly. You are going to go over some of these familiar features and view the various sections of your Home page. |
|
Chapter 1
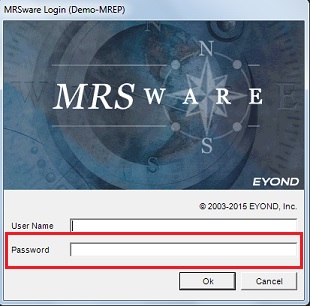
Starting MRSware Start MRSware by double clicking on the MRSware icon on your desktop. MRSware checks to see if there are updates and will automatically download new updates to your application. You do not have to do anything. Next, you will see a MRSware Login screen. Type your name in the “User Name” field. Next, type your password in the “Password” field. Click “Ok”. MRSware will verify your login and start up. |
|
|
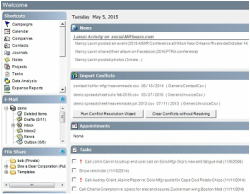
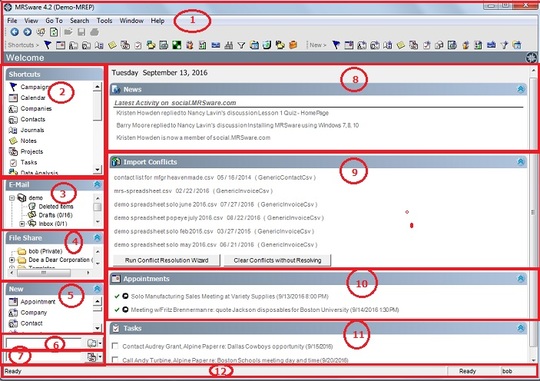
Chapter 2 Home Page When you log in to MRSware, your Home page will greet you. The Home Page displays a summary of your business. Everything starts here. This screen contains many of the features continually used throughout MRSware. You see a Menu bar, Toolbars, the Sidebar, the News panel, the Import Conflicts panel, the Appointments panel, the Tasks panel and the Task bar on this page. Let’s go over the various sections of your Home page in the numerical order you see in the screenshot to the left. The following chapters will start with the number that corresponds to the Home page section being reviewed. |
Chapter 3
1 - The Menu bar & Toolbars
The Menu bar
Do you remember when I mentioned that MRSware had a familiar look and feel to it? The Menu bar and Toolbars are some of these familiar features. Throughout MRSware these bars are designed to give you access to a variety of MRSware’s features. The bars work the same way as they would in many Windows applications.

|
Below the Title bar, which shows the "MRSware version # and Your Company Name”, you will see the Menu bar on the Home page, which consists of File, View, Go To, Search, Tools, Window, and Help. The screenshot to the right shows the Menus for MRSware’s Home page.
|
i The menu options will vary depending on the screen in which you are working.
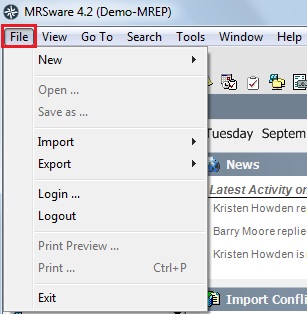
Here is a brief description of the function of each of the Home page’s menu options, along with a screenshot of the drop down options:
Here is a brief description of the function of each of the Home page’s menu options, along with a screenshot of the drop down options:
|
|
|
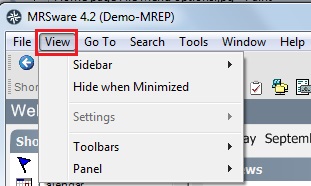
View: This menu allows you to manage the sidebar in MRSware, which includes resizing and collapsing the sidebar on the left side of your Home Page. The Toolbars – Main, Shortcuts, and New can be checked - to view them - or unchecked - to hide them. The Panel - Shortcuts and New. can be checked - to view them - or unchecked - to hide them. |
|
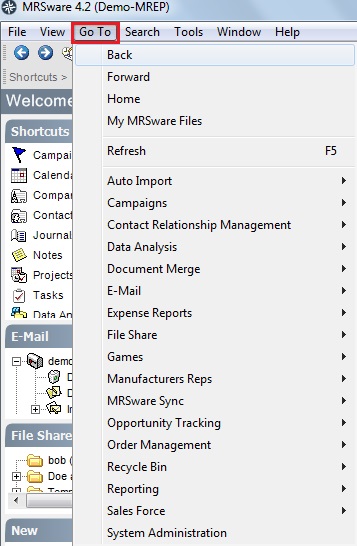
Go To: This is the most extensive menu in MRSware and provides access to most features within the application. The right facing arrows allow you to perform other actions in MRSware such as manage categories or types, use the Duplicate Contact Wizard in order to keep your database clean and up-to-date, go to Sales Rep Management to set up new sales reps or territories, and access System Administration to manage your users, view bills, and set permissions. System Administration is available for use solely by the company’s designated System Administrators. It is used to enable or disable user accounts, reset passwords, make adjustments to e-mail, add/change billing and payment information, set up MRSware Sync users, and to manage security in MRSware. |

|
Search: This menu is a handy tool to quickly look for and find specific data, such as a group of contacts, e-mails, or a journal, all by using the Advanced Search dialog boxes. |
|
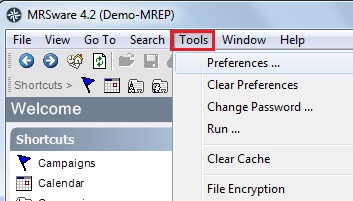
Tools: This menu option allows you to choose your preferences, which include setting your e-mail default format and signatures, as well as change your MRSware login password. |

|
Window: This menu allows you to open a new window, in the Sidebar - Shortcuts, E-mail, File Share, or New panels - without losing your place in the window in which you are currently working. This is a very handy option. |
|
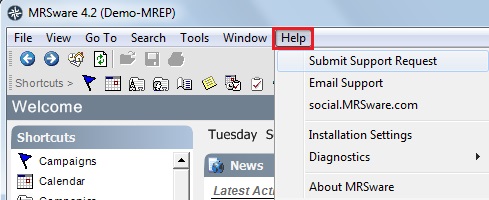
Help: Within this menu, you can submit a support request, look up help documents or release notes and find your company’s Installation settings in order to download and install MRSware on a new computer. |
To gain access to the menus, point your mouse at a name on the Menu bar and click once. By clicking once and holding down the left mouse button you can move your mouse up, down or side-to-side to view the options available to you along the entire Menu bar.
i When you see an arrow on the right side of a drop down list, there is another menu with further options.
For example - on the Menu bar, click on “Go To” and slide your mouse down until you highlight “Contact Relationship Management”. Now, slide your mouse over to “Manage Contact” and you will again see another group of options available. Click on one of the options and that dialog box will open.
Take the time to click on each menu on the Home page to familiarize yourself with the many options available to you.
The Toolbars
MRSware has three Toolbars – Main, Shortcuts, and New. These bars contain icons which will give you quick, one-click access to MRSware’s most common commands.
MRSware has three Toolbars – Main, Shortcuts, and New. These bars contain icons which will give you quick, one-click access to MRSware’s most common commands.

|
Main Toolbar i The icons found on the Main Toolbar will vary depending on the screen in which you are working. Here is a brief description of the Main Toolbar icons found on the Home page: |

|
The left facing arrow takes you back to the previous screen.
The right facing arrow takes you to the next screen
The heart icon is the Home page icon and will return you to your Home page when you click on it. Think "Home is where the heart is."
The double green arrows is the Refresh icon. When you click on it, the latest information available in your application will be added.
The “grayed-out” icons are not available for use on the Home page.
|
Shortcuts Toolbar i The icons found on the Shortcuts Toolbar will not vary, regardless of the screen in which you are working. |

|
Clicking on any of the icons in the Shortcuts Toolbar will take you to that specific module or area of MRSware.
Here are the names of each module in MRSware that corresponds to the icon on the Shortcuts Toolbar:
The blue flag icon takes you to Campaigns
The calendar icon takes you to Calendar
The building file card icon takes you to Companies
The person file card icon takes you to Contacts
The book page icon takes you to Journals
The yellow page icon takes you to Notes
The icon with calendar, journal, and task takes you to Projects
The checked page icon takes you to Tasks
The folders with blocks icon takes you to Data Analysis
The page with a check icon takes you to Expense Reports
The green block with black & white dots icon takes you to Reversi (a game our developers obviously like to play)
The multiple people icon takes you to Customers
The notched page icon takes you to Invoice Entry
The check icon takes you to Payment Entry
The factories icon takes you to Principal Summary
The funnel icon takes you to Opportunity Tracking
The folder & page with multiple pictures icon takes you to Product Catalog
The green bin icon takes you to the Recycle Bin
The folders with charts icon takes you to Report Explorer
The brief case icon takes you to Sales Rep Management
|
New Toolbar i The icons found on the New Toolbar will not vary, regardless of the screen in which you are working. |

|
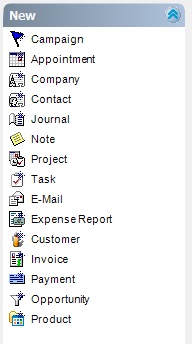
The New Toolbar icons all start with "Create New" which opens a new window. Here are the names that corresponds to the icons on the New Toolbar:
The blue flag icon opens a new campaign
The calendar icon opens a new appointment
The building file card icon opens a new company
The person file card icon opens a new contact
The book page icon opens a new journal
The yellow page icon opens a new note
The icon with calendar, journal, and task opens a new project
The checked page icon opens a new task
The envelope icon opens a new e-mail
The page with a check icon opens a new expense report
The multiple people icon opens a new customer
The notched page icon opens a new invoice or new order
The check icon opens a new payment
The funnel icon opens a new opportunity
The folder & page with multiple pictures icon opens a new product
To view the function of each icon on the Toolbars, slide your mouse across the icons slowly. As you move your mouse over the icon, notice the name appears just below the icon.
i By default, when you login for the first time the only Toolbar showing is the Main Toolbar which is found just below the Menu bar. In order to turn on the Shortcuts and New Toolbars, click on “View” on the Menu bar and click on the toolbar you want to appear on your screen.
i The toolbars can be moved by you to any location on your screen. The Main Toolbar cannot be moved and is place directly under the Menu bar. In order to move the Shortcuts or New Toolbars to another location, move your mouse to the left of the toolbar. When you see an arrow with 4 heads, left click and move the toolbar to your preferred location.
Take the time to move your mouse over each icon in the Toolbars to familiarize yourself with the many options available to you.
Chapter 4
2 – 7 - The Sidebar
The Sidebar is located on the left side of your screen and incorporates the Shortcuts panel, the E-mail panel, the File Share panel, the New panel, the Quick Contact Selector, and the Quick Project Selector.
i By default all the Side panels are turned on when you login for the first time. You have the option of turning off the Shortcuts panel and the New panel. To turn off and on these two panels click on “View -> Panel” on the Menu bar and check or uncheck “Shortcuts” or “New”.
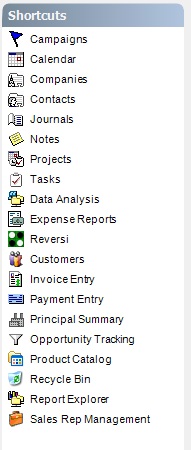
2 - The Shortcuts Panel
The Shortcuts panel contains many of the modules within MRSware.
i Some of the modules appearing in the figures shown are unavailable to specific users. Depending on the permissions set by the company, a module may be restricted and therefore will not appear in your Shortcuts panel list.
Here is a brief description of the function of each of the modules seen in the screenshot to your left.
Campaigns: Use this module to set up and track the performance and value of sales and marketing promotions and programs. When used with Opportunity Tracking and Expense Reports, you can learn where your company’s resources are best spent.
Calendar: Use this module to schedule and track appointments in the system. You can see appointments, uncompleted tasks, with due dates assigned to you, and holidays.
Companies: Along with Contacts, Companies is the heart of the MRSware CRM system. Virtually all information is associated to Companies and Contacts. Companies tracks information about a business or organization.
Contacts: Along with Companies, Contacts is the heart of the MRSware CRM system. Virtually all information is associated to Contacts and Companies. Contacts tracks information about an individual.
Journals: Use this module to track information on all interactions with a company or contact in MRSware. Journals are integral to both the MRSware CRM and SFA systems.
Notes: Use this module as your private “sticky notes” reminders.
Projects: This module provides a useful way of grouping together opportunities, files, activities, tasks, appointments, companies, contacts, e-mails, campaigns, and expense reports that apply to a job or quote, for multiple users.
Tasks: Use this module to organize and schedule work that needs to be completed.
Data Analysis: Use this module to go beyond the standard report format found in Report Explorer. Data Analysis provides you with a data mining tool to sort and filter your information as well as the ability to breakdown your information by additional criteria for a customized view.
Expense Reports: Use this module to log, track, approve, pay and reconcile all expenses accrued during daily sales calls, business trips, meetings, or expenses tied to sales and marketing programs. When used with Campaigns and Opportunity Tracking, you can learn where your company’s resources are best spent.
Reversi: Reversi is a game of strategy.
Customers: Use this module to view a list of customers showing the Principals from whom they buy, along with YTD current year and YTD previous year sales figures.
Invoice Entry: Use this module to add orders, add invoices, or adjust sales and commission numbers.
Payment Entry: Use this module to reconcile commissions; add payments or adjust or enter partial payments.
Principal Summary: Use this module for a quick view of the total sales and commissions for each of the company’s Principals.
Opportunity Tracking: Along with Journals, this module is the heart of the SFA system. Use Opportunity Tracking to enter, follow and measure the progress of bids, leads and new business opportunities. When used with Campaigns and Expense Reports, you can learn where your company’s resources are best spent.
Product Catalog: Use this module to build a listing, either groupings of products or specific line item SKU’s, of all your Principal’s products.
Recycle Bin: Use this module to find files you may have deleted from MRSware.
Report Explorer: Use this module to view or print a variety of reports
Sales Rep Management: Use this module to set up new sales reps or territories, and assign commission rates.
To access the modules on the Shortcuts panel, move your mouse up or down the list and click once on the module you want to open.
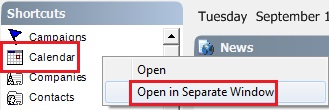
For example: Move your mouse to and highlight “Calendar”. Left click your mouse. The Calendar screen will open. To return to your Home page, click on the “Home page” icon on the Toolbar or click the left facing arrow “Back” icon.
|
! Tip: Another way to access the Calendar module is to highlight “Calendar”, right click your mouse and left click on “Open in a Separate Window” as seen in the screenshot to the right.
This will pop open a small version of your Calendar, without losing your place on the Home page. When you have completed your work in the calendar, click on the red "X" box in the upper right hand corner of the window to close it. i You may also access “Open in Separate Window”, using the Shortcuts Toolbar, by holding down the “Ctrl” key on your keyboard, and click your left mouse button. This will open a separate window for you to work in without losing your current place in MRSware. Take the time to open each module to see what it looks like. |

|
3 - The E-mail Panel The E-mail panel contains the individual mailboxes set up by the company. You will see your mailbox and any other mailboxes that are for company-wide usage, such as a general mail box for sales or service. The screenshot to the left displays "demo" where your name will appear. You will also find folders for Mail Templates, Local Mail and Search. To open any of the mailboxes, click on the “+" sign to the left of the mailbox. This will display the folders within the main mailboxes. To open any of the folders, left click on the name, such as “Inbox”. To add a sub folder to any of the folders, such as “Inbox”, right click and select “New Folder”. Take the time to click on your mailbox and try adding a new folder to your Inbox. |
|
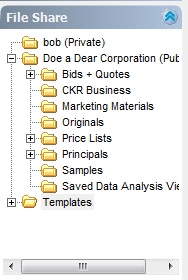
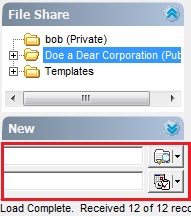
4 - The File Share Panel The File Share panel contains the folders and files that are part of MRSware’s document management system. There are Private files (your name will appear next to the Private folder), Public files (the name of the company will appear next to the Public files), and “Templates”. File Share uses a revision control system to coordinate changes to files from multiple users. A file is checked out to make changes, then saved and checked in to update the file in File Share. Each file has its own permissions allowing who can view, make changes to, or delete the file. To open a folder, left click on the “+" sign to the left of the folder, then left click on the name of the folder or file you wish to view. Take the time to click on a folder to view it. |
|
5 - The New Panel The New panel provides a one-click option to create new additions to the MRSware system. You can add a new Appointment, Company, Contact, Journal, Note, Project, Task, E-mail, Expense Report, Customer, Invoice or Order, Payment, Opportunity, or Product. To access the New panel, move your mouse up or down the list and click on the new option you want to add to your system. For example, if you want to add a new journal to add sales call activity, highlight “Journal” and left click your mouse. A blank Journal will open. Take the time to open each option to view the blank dialog boxes for your use. |
|
6 - 7 – The Quick Selectors MRSware has two Quick Selectors – Quick Contact Selector and Quick Project Selector. The selectors allow you to access, quickly, companies, contacts or projects in your MRSware system without having to load and then scroll through your list in the tables. To use the Quick Contact Selector, type in part of the company or contact name, click “Enter” or the file card icon to the right of the field, and the company or contact card you entered will open. |
|
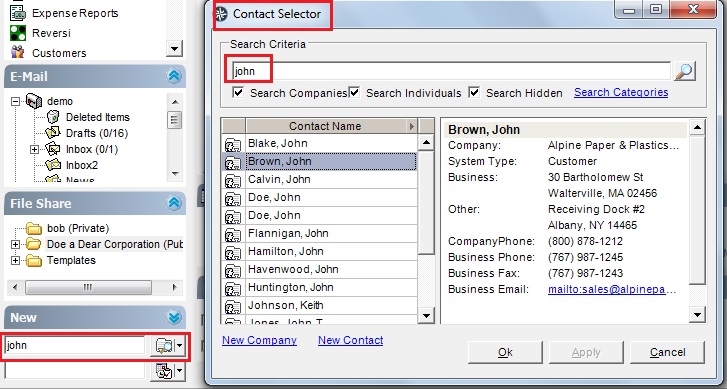
If the name you entered has more than one option a Contact Selector dialog box will open (see screenshot to the right) when you click "Enter" or click the file card icon to the right of the field. Scroll through the list and select the name you want, and then click “Ok”. |
|
|
! Tip: Click on the down arrow to the right of the Quick Contact Selector field. Make sure you have “Edit” selected. |
|
|
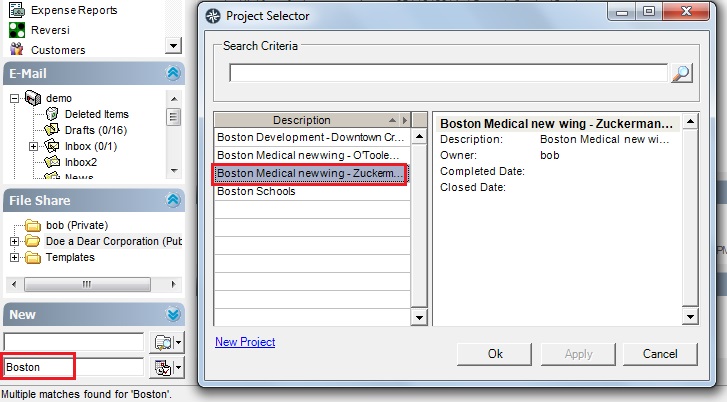
To use the Quick Project Selector, type in part of the project name, click “Enter” or the file card icon to the right of the field, and the project you entered will open. If the project name you entered has more than one option a Project Selector dialog box will open (see screenshot to the right) when you click "Enter" or click the file card icon to the right of the field. Scroll through the list and select the project name you want, and then click “Ok”. |
|
|
! Tip: Click on the down arrow to the right of the Quick Project Selector field. Make sure you have “Edit” selected. |
|
Chapter 5
8 - 12 - The Main Panels
The Main Panels are located on the right side of your screen and incorporates the News panel, the Import Conflict panel, the Appointments panel, and the Tasks panel.
8 - 12 - The Main Panels
The Main Panels are located on the right side of your screen and incorporates the News panel, the Import Conflict panel, the Appointments panel, and the Tasks panel.
|
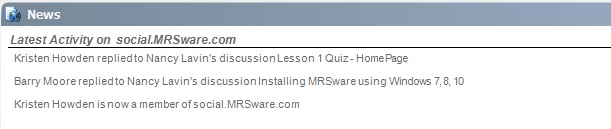
8 - The News Panel The News Panel is directly under today’s date. It displays the “Latest Activity on social.MRSware.com”. Move your mouse over any of the titles and a small hand with a finger pointing up will appear over the selected title. When this icon appears, left click on the “title”, and your computer will take you directly to the article requested. Please try this now. When finished reading the article, click on the red "x" in the upper right hand corner to return to your Home page. |
|
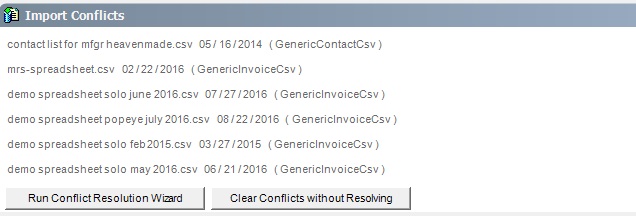
9 - The Import Conflicts Panel Located under the News Panel, the Import Conflicts Panel displays the data entry conflicts that need to be resolved. To access the conflicts, move your mouse over the names of the conflicts. When a small hand with the finger pointing up appears, left click on the “name of the conflict” and your computer will take you to the Import Conflict Resolution Wizard. i This panel will only show conflicts to the users who have permission to add/edit sales and commissions to the system. |

|
10 - The Appointments Panel Located under the Import Conflicts Panel, the Appointments Panel displays your appointments for the next 7 days. i If someone invites you to a meeting or schedules a meeting for you, you will see a blinking * to the left of the appointment. Once you accept/do not accept the invitation to the appointment, the * will stop blinking. You can open any of your appointments by moving your mouse over the appointment. When a small hand with a finger pointing up appears, left click on “the appointment” and your Add/Edit Appointment window will open. |

|
11 - The Tasks Panel Located under the Appointments Panel, the Tasks Panel displays your tasks that need to be completed by a listed due date. i If someone assigns you work, you will see a blinking * to the left of the task. Once you open the task, the * will stop blinking. You can open any of your tasks by moving your mouse over the task. When a small hand with a finger pointing up appears, left click on “the task” and your Add/Edit Task dialog box will open. Take the time to click on an article in the News Panel, a conflict in the Import Conflicts Panel, an appointment in the Appointments Panel, and a task in the Tasks Panel. |

12 - The Taskbar
The Taskbar is located near the bottom of the screen. The Taskbar displays the activity currently taking place.
Displayed on the left side of the Taskbar is the current activity. The MRSware system is providing you with the information you requested in a Quick Contact Selector search shown in the screenshot above.
Displayed on the far right side is the name of the user currently logged in to MRSware (shown in the screenshot above, bob is logged in to MRSware. To the left of the user’s name Ready is displayed. When the application is searching, you will see a green arrow, or Send/Receive which means your computer is searching for the information you requested.
Chapter 6
Final Thoughts
You’ve now learned how to login to MRSware, how to access different areas in MRSware and all the parts of your Home Page.
To shut down MRSware, make sure you have saved any new information you have added to the various MRSware windows. Usually this means clicking on any of the windows that are open and clicking on Save and Close. This saves your new information to the company’s system, making it available for every user in the system that has the appropriate permissions.
|
Once you have saved all your windows, close MRSware.
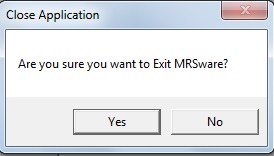
You can do so by clicking on File → Logout. Or you can click on the red "X" box in the upper right hand corner of the screen. When you do either a small window will ask you if you're sure you want to exit MRSware. If you do, click Yes; if you do not want to exit, click No. i If you click File → Exit, MRSware closes without asking if you want to logout. When you feel you fully understand the information, take the quiz. |
|