By its nature, a project is linked to various other areas of MRSware, such as Companies, Contacts, Calendar, Journals, Tasks, File Share, Campaigns, Opportunities, Expenses, and E-mail. All of the above can be associated with a project in order for everyone to follow the steps you’ve created to achieve your project’s goals.
MRSware’s Projects can be used to fit your needs in planning, managing and measuring projects, from the Initiation phase through to the Completion phase. Projects will be used to coordinate schedules and activities, tying those activities, documentation, and expenses, across multiple contacts and Users, to the project in order to assure the project’s successful completion.
Today, you are going to go through each area of a Project, learn why you will use each field and how to add information to the project already in your system.
Chapter 1
Projects
Projects contain all the details of any deal, event, job, or quote. Whether it’s a specification file, an opportunity, an appointment, a journal, a task, an e-mail, a marketing campaign, an expense, a company or contact card, it can be linked to a project and shared with all Users who are participating in the project.
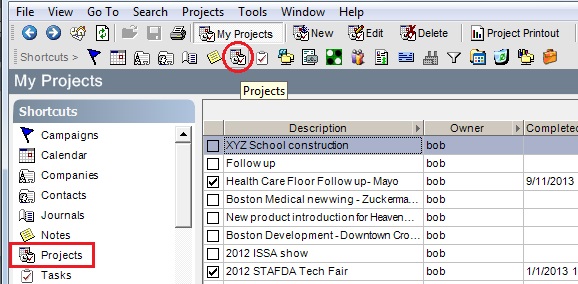
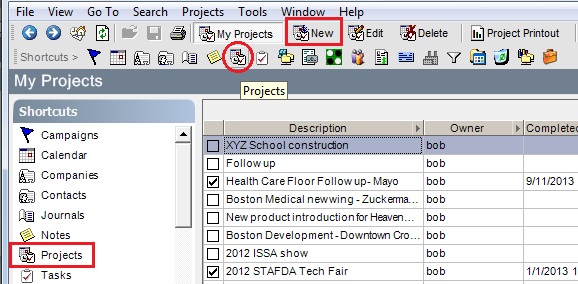
Login to MRSware now. Once MRSware is open, click on Projects in the Shortcuts panel or click on the Projects icon on the Shortcuts Tool bar.
Projects Menu bar and Tool bar
When Projects opens, look at the Menu bar and the Toolbar. Notice the changes in the options available on the Menu and Toolbars from the options available on the Home page, Companies, Contacts, Calendar, Journals and Task bars.
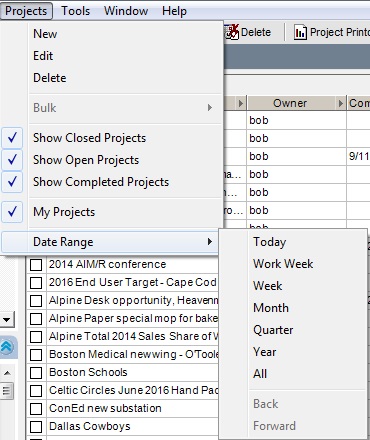
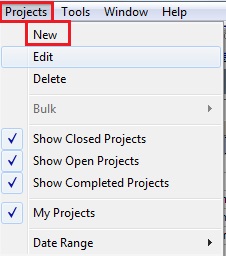
The Menu bar has one new Menu option – Projects
Now take a look at the Projects Toolbar. There are several new buttons available. Move your cursor over each icon to see what their function is. Then click on each of the new buttons available to you.
Did you notice, like similar Tool bars throughout MRSware, you can add a new Project, edit a Project already in your system, or delete a Project already in the system?
Did you notice, like similar Tool bars throughout MRSware, you can add a new Project, edit a Project already in your system, or delete a Project already in the system?
|
There is also a Printout button. To use the Printout button:
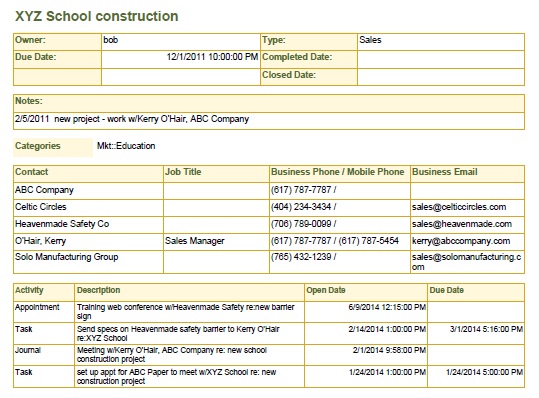
1. Highlight a specific project in the Projects table 2. Click on the Printout button 3. When the Report Prompt for the Project Printout dialog opens, select the options you want to see in the report, from the drop down arrows – the Activity Since date and the number in Top Count 4. Click OK 5. The report opens in the default .pdf format. The report displays the information found in the project. The printout may be used to report to manufacturers who want to know about a specific deal, job, or quote, or provide a prospect with a copy of the completed project. |
Did you notice the Date Range selector buttons on the Tool bar?
Move your cursor over each icon to see what their function is. Click on one or two of the buttons to view the different displays of projects.
To use the Date Range selector buttons:
1. Click on the date for the projects you want to display in the table
2. The table displays the projects for the specified period of time
Chapter 2
Edit Project/Add Project
There are two types of Projects:
1 – A project already in your system – Edit Project
2 – A blank project – Add Project
Edit Project
Edit Project is a project containing information that is already in your system. Access this window when you want to review, add to, update, or change the information found within the current project.
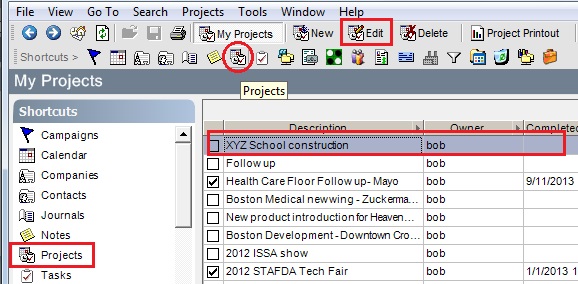
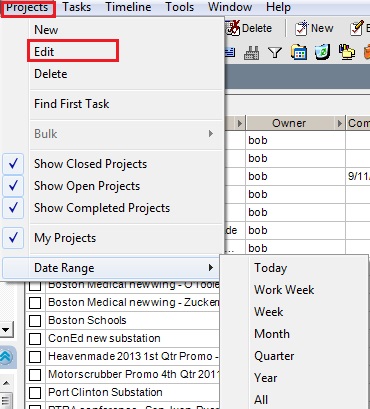
There are four ways to access a current project or the Edit Project window:
|
Option 1 – 1 – Click on Projects found in the Shortcuts panel or the Projects icon on the Shortcuts Toolbar 2 – Wait for all of the projects to load (watch the task bar for the completion of this operation) 3 – Highlight a specific project in the Projects table 4 – Double-click, or right click and select Edit on a specific project 5 - The Edit Project window will open |
Try opening an Edit Project window, using a project in your system. Then change or update information in the project and when the change is completed, click Save and Close.
Which option is easier to use and saves you time while you work?
Add Project
The Add Project is a blank project waiting for you to create a new job, deal, quote, or event.
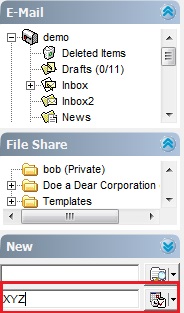
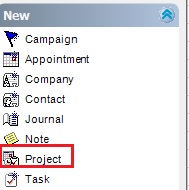
There are six ways to open a new Project:
Which option is easier to use and saves you time while you work?
Add Project
The Add Project is a blank project waiting for you to create a new job, deal, quote, or event.
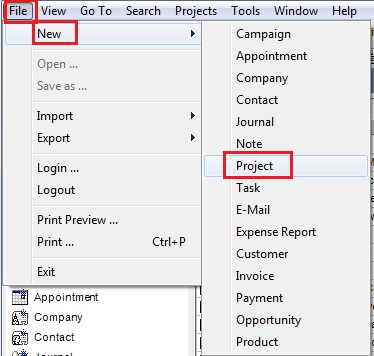
There are six ways to open a new Project:
|
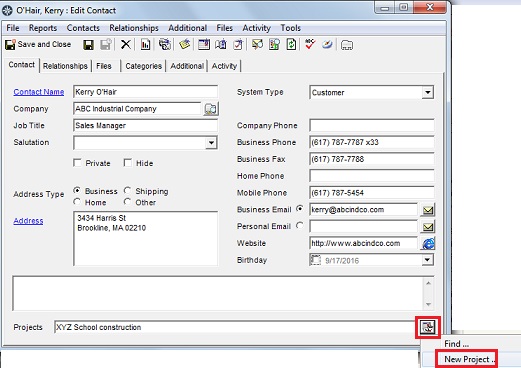
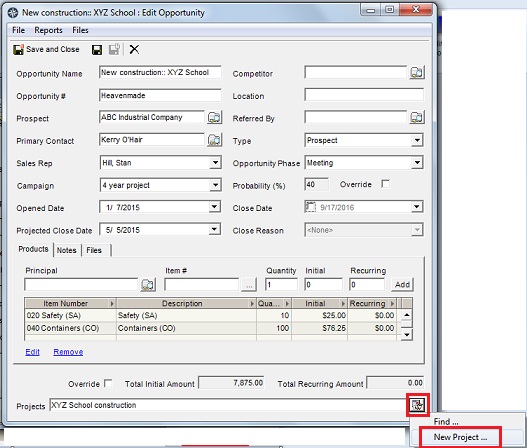
Option 6a – 1 – Open a Company or Contact card 2 – Click on the Projects button on the far right side of the Projects field at the bottom of the company or contact card 3 – Click on New Project 4 – The Add Project window opens Option 6b – 1 – Open an Opportunity 2 – Click on the Projects button on the far right side of the Projects field at the bottom of the opportunity 3 – Click on New Project 4 – The Add Project window opens |
Open an Add Project window using all of the options shown above.
Which do you prefer? Is one option faster than the other? Will one option save you time?
Regardless of the option you choose to open an Add Project window, the method in which you enter information is the same.
Open and add a new project to your database. Follow the steps below to enter information.
! Tip:
Don’t forget to hit the Tab key to move from field to field.
1 – Open an Add Project window using one of the options previously discussed.
2 – Click your cursor in the blank Description field and add the Project name
3 – Click the drop down menu next to Type to select the Project type
4 – Click the drop down menu next to Due Date to select the day the project is due
5 – Type in any general information details in the Notes section
6 – Type in all the names of the companies and contacts associated with the project in the Contacts field
7 – Click on the Categories tab and check the boxes of all applicable categories
8 – Click on the Files tab to add any documents that pertain to the project
9 – When done, click Save and Close
OR
9 - If you want to continue to add information to the project, click Save (the disc icon to the right of Save and Close). This will keep the current project open for reference or for further additions or changes.
i The Contacts field is an essential parts of the Project window. All names – companies and contacts – you type into the Contacts field will be automatically associated with the project you save. The project is entered once and saved to all the company and contact cards listed in the Contacts field. The project will appear in the Activity list of all the associated company and contact cards.
Open any or all of the companies and contacts entered into the Contacts field in the project you just added to your system. Click on the Activity tab for each company and contact to see the project you have added.
As with the Contacts field, you can also add a project to an opportunity, campaign, or expense by typing in the name of the project in the blank Projects field at the bottom of their windows. The opportunity, campaign, or expense will be associated automatically with the project and will appear in the Activity list of the project.
After typing in the name of the project into the Projects field of an opportunity, campaign, or expense, click on the Activity tab in the Project to view the associated opportunity, campaign, or expense that you added.
Chapter 3
The Project Title bar, Menu bar, Toolbar, and the Tabs
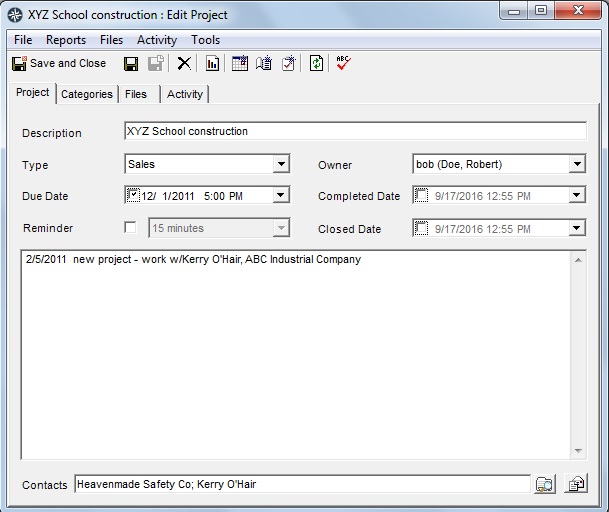
Up to now, when you edit a project or add a new project, the Project main page displays. The main page shows the general information found in a project. This includes the name of the project, the type of project, who opened the project, when it is due, and may include an overview of the project in the Notes field as well as who the project is associated with in the Contacts field.
Projects is an important part in building your Relationship Database, as each project can be linked to journals, tasks, appointments, e-mails, opportunities, campaigns, and expenses that in turn are linked to all companies and contacts associated with the project. The Menu bar, Tool bar, and Tabs will be used in your project to track categories and activities, and attach files pertaining to the project.
|
Menu bar
Under the Title bar, is the Menu bar - the menus from left to right are: File, Reports, Files, Activity, Tools. Each menu option has a drop down list which allows you to perform another action. Take the time now to click on each option on the Menu bar and view the drop down lists and the options available to you. |
|
Toolbar
Under the Menu bar, is the Toolbar - the icons from left to right are: Save and Close, Save, Save and New (grayed out) Delete, Run Project Printout Report, New Appointment, New Journal, New Task, Refresh, and Spell Check. These buttons are short cuts to other windows or dialog boxes within the CRM application. Take the time now to click on each of the icons or buttons. Each button, other than Save and Close, Save, or Delete, will open another window or dialog box allowing you to save time and add more information to your Relationship Database. i The project must have a name and be saved before you can use the Run Project Printout Report, New Appointment, New Journal, New Task, or Spell Check buttons. |
Here is a brief description of each of the tabs in the Project:
Project: This tab displays the main page of the Add Project or Edit Project window. Shown are the description (name of the project), the type of project it is, the person who opened the project, the day the project is due, the day the project is done, the day the project is closed, and the Notes field (the large section in the middle of the page. At the bottom of the page is the Contacts field, where you associate companies and contacts with the project.
Categories: This tab opens to a list, which your management creates, so you can group projects for searching and filtering. For example, you may include information on the kind of work the project represents (new construction, replacement parts, tradeshow, etc). Once the categories are created, you can use Search on the MRSware main Menu bar to look for groups or lists or projects in order to find trends, amount of time spent on specific projects and the manufacturers, or customers to whom they apply.
Files: This tab opens to a list of files that are related to the project. For example, the files may include specs, or quotes that are needed for the project.
Activity: This tab opens to a list of all activities associated with the project. For example, all appointments, journals, tasks, opportunities, campaigns, expenses, and e-mails will be shown in the table.
Take the time now to click on each tab in a Project within your system to view the information available.
Chapter 4
Final Thoughts
Now that you can add a new project and edit or update a current project, you can continue to add to your Relationship Database. The projects fill out information about your Companies and Contacts, providing you with the knowledge you need for successful business interactions. You’ll have all the information you need to plan your sales calls and stay abreast of your customer’s, prospect’s, end user’s, Principal’s, and other business partner’s ventures in order to provide superior service and support.
When you feel you fully understand the information, take the quiz.
Lesson 6 Quiz - CRM - Projects
This quiz is designed as a multiple choice format. When you have completed the quiz, enter your name and e-mail address, then click Submit Answers. You will receive an e-mail response with the correct answers.
Good luck.
This quiz is designed as a multiple choice format. When you have completed the quiz, enter your name and e-mail address, then click Submit Answers. You will receive an e-mail response with the correct answers.
Good luck.
