|
Lesson 4 - CRM – Journals
In this lesson, you are going to learn about Journals. You will use journals to enter details of sales calls, phone conversations, meetings, support calls, demos, tradeshows, conferences and any other event or activity. All journals should be associated to the companies and/or contacts they apply to in your system. Journals can also be associated with projects. Once they are associated with a company, contact, or project any User in your system can access the information found in these journals. By opening the Activity lists in a company, contact, or project the User can read or edit the information as necessary. Customer service will be aware of current activity, quotes or support issues discussed during sales calls. Outside sales reps will be aware of support issues, sample or literature requests made of Customer service reps. Project members will be up-to-date on activities that have taken place. Everyone will be able to respond quickly and accurately when asked questions. Journals make up a large share of your Relationship Database. Virtually all “touch points” with your Principals, customers, prospects, leads, end users and other partners and associates are found in Journals. These journals can be reviewed, edited or even form the basis of a manufacturer’s reporting requirements. Today, you are going to go through each area of a Journal, learn why you will use each field and how to add information to the journal already in your system. |
Chapter 1
Journals
Journals contain all the details of any event or activity in which anyone in your company participates. Whether it is a phone call taken by a Customer Service Rep, a demo made by a specialist, a bid request, a manufacturer sales meeting or a daily sales call, you will enter all the pertinent notes into a journal.
Login to MRSware now. Once MRSware is open, click on Journals in the Shortcuts panel or click on the Journals icon on the Shortcuts Toolbar.
Journals Menu bar and Toolbar
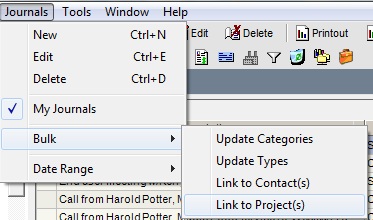
When Journals opens, look at the Menu bar and the Toolbar. Notice the changes in the options available on the Menu and Toolbars from the options available on the Home page, Companies and Contacts, and Calendar bars.
The Journals Toolbar has several new buttons available. Move your cursor over each icon to see what their function is. Then click on each of the new buttons available to you.
Did you notice, like similar Toolbars throughout MRSware, you can add a new Journal, edit a Journal already in the system, or delete a Journal already in the system?
Did you notice the new icons on the Toolbar – Printout, Activity, Sales Activity, and the Date Range Selector buttons?
|
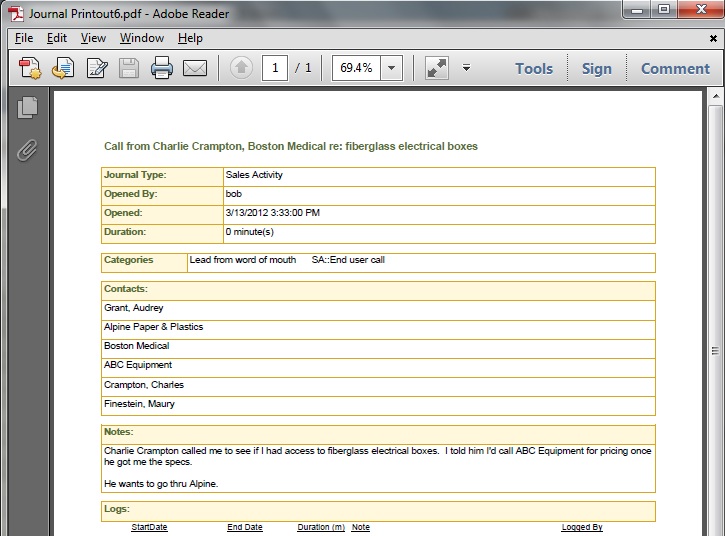
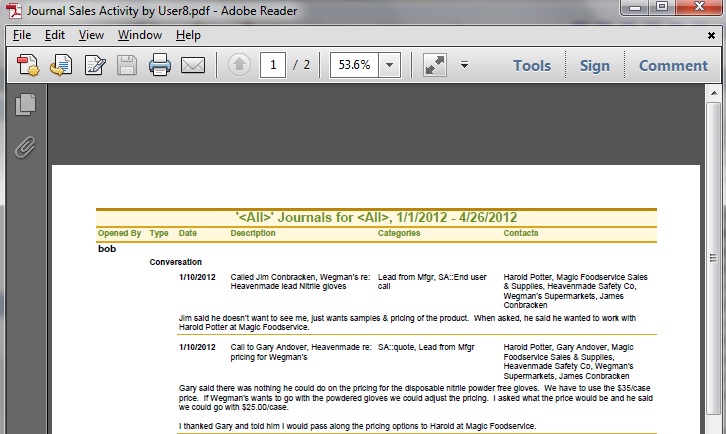
To use the Printout button: 1. Highlight a specific journal 2. Click on the Printout button 3. When the Report Prompt for Journal Printout dialog opens 4. Click Ok 5. The Report opens in the default .pdf format |
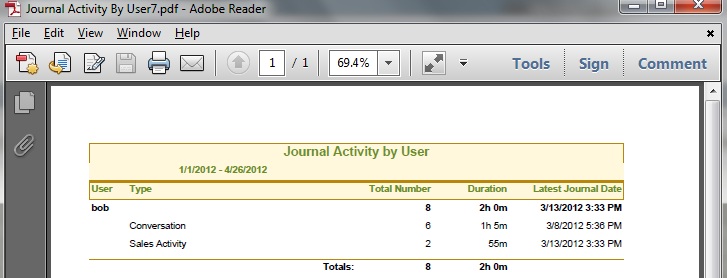
To use the Activity button: 1. Click on the Activity button 2. When the Report Prompt for Journal Activity by User dialog opens, select a date range, check the box if you want the report to show contacts, select your user and a specific Contact Name if you wish. 3. Click Ok 4. The Report opens in the default .pdf format |
To use the Sales Activity button: 1. Click on the Sales Activity button 2. When the Report Prompt for the Journal Sales Activity by User dialog (Figure 8) opens, select a date range, a specific journal type, a user and specific Contact name if you wish. 3. Click Ok 4. The Report opens in the default .pdf format |
The above reports display the information found in the journals. They can be used to report to manufacturers who want to know about a specific activity or for weekly reporting or to view the types of activity performed by a specific person.
If you want to send a report to just one manufacturer and your report shows multiple manufacturers for each journal you can open the report in Excel. To open the report in Excel, click on the down arrow in the Report Prompt and select XLS (Excel). When the report opens in Excel, delete the non related information before sending the requested manufacturer their activity report.
Did you notice the Date Range selector buttons?
To use the Date Range selector buttons:
1. Click on the date for the journals you want to display in the table
2. The table displays the journals for the specified period of time
Chapter 2
Edit Journal/Add Journal
There are two types of Journals.
1 – A journal already in your system – Edit Journal.
2 – A blank journal – Add Journal.
Edit Journal
Edit Journal is a journal containing information that is already in your system. Access this window when you want to review, add to or change the information found within the current journal.
There are three ways to access a current journal or the Edit Journal window.
Option 1 -
1 - Click on Journals found in the Shortcuts Panel or the Journals icon on the Shortcuts Toolbar.
2 - Wait for all of your journals to load (watch the task bar for the completion of this operation).
3 - Highlight a specific journal.
4 - Double-click, or right click and select Edit on a specific journal and that specific Edit Journal window will open.
Option 2 -
1 – Repeat steps 1 – 3 in Option 1
2 – Click on Edit on the Toolbar and that specific Edit Journal window will open.
Option 3 –
1 – Type a company or contact name in the Quick Contact Selector found at the bottom of the Side bar.
2 – Hit Enter on your keyboard
3 – When the company or contact card opens, click on the Activity tab
4 – Double-click on a specific journal and that specific Edit Journal window will open.
|
Bob wants to add additional information to his report concerning his last call on Audrey at Alpine Paper.
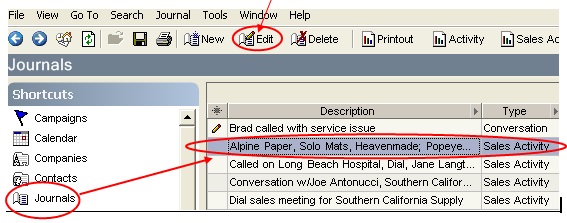
Here’s an example using Option 1 and Option 2 to open the Edit Journal: 1 – Click on Journals in the Shortcuts Panel. 2 – Highlight the specific Alpine Paper note 3 – Double-click on the specific Alpine Paper description line (Option 1) OR 3 - Click on the Edit icon on the Toolbar (Option 2) 4 – The window titled Alpine Paper, Solo Mats, Heavenmade, Popeye Mops, Celtic Circles : Edit Journal will open. |
|
Using the same information in the example above:
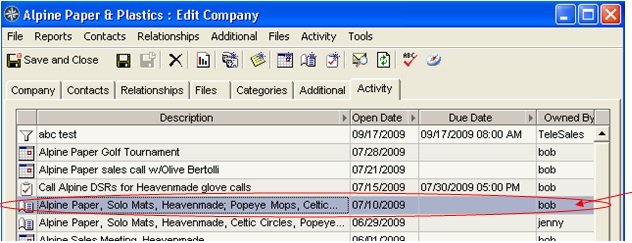
Here’s an example using Option 3 to open the Edit Journal window: 1 - Type Alpine Paper in the Quick Contact Selector found at the bottom of the Side bar 2 - Hit Enter on your keyboard 3 - The window titled Alpine Paper: Edit Company will open 4 - Click on the Activity tab 5 - Double-click on the Alpine Paper, Solo Mats, Heavenmade, Popeye Mops, Celtic… journal description opened by Bob and the journal will open. |
Open an Edit Journal window, using a journal in your system. Then change something in the journal and when the change is completed click Save and Close.
Which option is easier to use and saves you time while you work?
Regardless of the option used to open the Journal, you will edit the information the same way.
1 – Click in the field you want to edit (in our Alpine Paper example, you want to add information to the notes, so you will click on the Notes field.
2 - Make the additions to the information already in the system.
3 – When finished, click Save and Close
OR
3 - If you want to continue to add information to the journal, click Save (the disc icon to the right of Save and Close). This will keep the current Journal open for reference or for further additions or changes.
Add Journal
The Add Journal is a blank journal waiting for you to create a new note in your system.
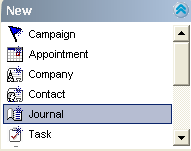
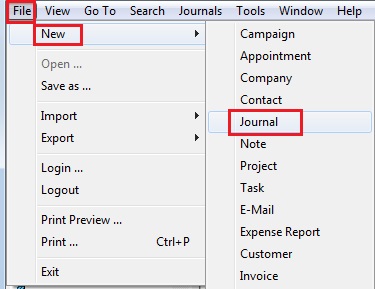
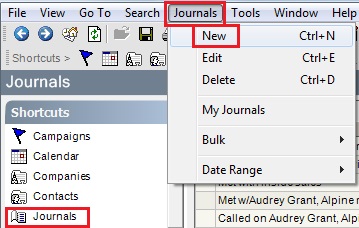
There are six ways to open a New Journal:
Open an Add Journal window using all of the options shown above.
Which do you prefer? Is one option faster than the other? Will one option save you time?
Regardless of the option you choose to open the Add Journal window, the method in which you enter information is the same.
Open and add a new journal to your database. Follow the steps below to enter information.
! Tip:
Don’t forget to hit the Tab key to move from field to field.
1 – Open an Add Journal window by using one of the options previously discussed.
2 – Click your cursor in the blank Description field.
3 – Type in a description of the activity.
4 – Using the drop down menu, select the journal Type.
5 – If the date of the activity is different from the date listed, change the date. You may also add a specific time if you choose.
6 – Type in the amount of time spent on the activity in the Duration field (e.g. 1h or 15m) or click on the right facing arrow to start the timer.
7 – Type the details of the activity in the Notes field
8 – Click on the Categories tab
9 – Check all the categories that apply to the activity
10 – Type in all the names of the companies and contacts that are discussed in the notes section in the Contacts field, and the names of the Projects that may apply to the activity.
11 – Click on Save and Close.
OR
11 - If you want to continue to add information to the journal, click Save (the disc icon to the right of Save and Close). This will keep the current Journal open for reference or for further additions or changes.
i The Contacts field is an essential part of the Journal window. All names – companies and contacts – you typed into the Contacts field will be automatically associated with the journal you have saved. You enter the journal once and it will appear in the Activity list of all names in the Contacts field.
As with the names in the Contact field, the saved journal will be automatically associated with any projects you have typed into the Projects field and will appear in the Activity list of all the projects listed in the Projects field.
Open each of the companies and contacts you entered into the Contacts field of the journal that was just added to your system. Click on the Activity tab for each company and contact and you will see the journal you have added in each Activity list.
Open each project you entered into the Projects field of the journal that was just added to your system. Click on the Activity tab for each project and you will see the journal you have added in each Activity list.
Chapter 3
The Journal Title bar, Menu bar, ToolBar and the Tabs
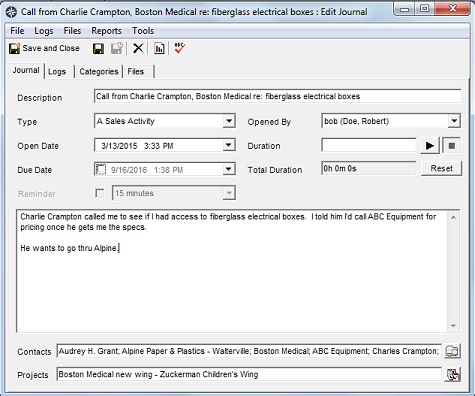
Up to now, when you edit your notes or add a new journal, the Journal main page displays. The main page shows the general information usually found in a Filofax type of notepad. This includes who was involved in the activity, the type, the day and duration of the activity, who opened the note and the details of the activity. The page also displays the contacts and projects that pertain to the activity.
When you’re building a Relationship Database, your journals are the main course of your Companies and Contacts’ Activity lists. The information found in the journals can provide you with information on competitive activities, promotions, trends and specific company/contact events. You will use the tabs in your journals to track categories and attach files associated with the activity.
|
Menu bar
Under the Title bar, is the Menu bar - the menus from left to right are: File, Logs, Files, Reports, and Tools. Each Menu option has a drop down list which allows you to perform another action. Take the time now to click on each option on the Menu bar and view the drop down lists and the options available to you. |
|
Toolbar Under the Menu bar, is the Toolbar - the icons from left to right are: Save and Close, Save, Save and New (grayed out), Delete, Journal Printout (report) and Spell Check. These buttons are short cuts to other windows or dialog boxes within the CRM application. Take the time now to click on each of the icons or buttons. Each button will open another window or dialog box allowing you to save time and add more information to your Relationship Database. |
Here a a brief description of each of the tabs in the Journals window:
Journal: This tab displays the main page of the Add Journal or Edit Journal window. Shown are the description, the type, the day and time and the duration of the activity along with the name of the person opening the journal. There is a Notes section in the middle of the page where you enter the details of your activity.
Under the Notes field is the Contacts field. This is a crucial field in Journals. Rather than having to type up several journals for one activity, you can associate one journal with several companies or contacts. Anyone who is represented in the activity should be included in the Contacts field. Under the Contacts field is the Projects field. Much like the Contacts field, the Projects field allows you to associate one journal with several projects. Any project related to the activity should be included in the Projects field.
Logs: This tab opens to a list showing specific work time and notes on that work.
Categories: This tab opens to a list, which your management creates, so you can group journals for searching and filtering. For example, you may include information on the kind of event or activity the journals represent (e.g. sales meeting, end user call, demo, tradeshow, sales call, conference, training, buying groups, leads from marketing programs, promotions, etc). Once the categories are created, you can use Search on the main Menu bar to look for groups or lists in order to find trends, amount of time spent on specific activities and manufacturers you have discussed with customers, prospects, etc.
Files: This tab opens to a list of files that are related to the journal. For example, the files may include quotes, promotions or presentations you used during the meeting.
Take the time now to click on each tab in a Journal within your system to view the information available.
Chapter 4
Final Thoughts
Now that you can add a new journal and edit or update a current journal, you can begin to build your Relationship Database. The journals fill out your Companies and Contacts, providing you with the knowledge you need for successful business interactions. Shared Journals increase collaboration in your company, providing information needed to plan your sales calls, make a connection with your customer, prospect or Principal, and provide superior customer service.
When you feel you fully understand the information, take the quiz.
Lesson 4 Quiz - CRM - Journals
This quiz is designed as a multiple choice format. When you have completed the quiz, enter your name and e-mail address, then click Submit Answers. You will receive an e-mail response with the correct answers.
Good luck.
This quiz is designed as a multiple choice format. When you have completed the quiz, enter your name and e-mail address, then click Submit Answers. You will receive an e-mail response with the correct answers.
Good luck.

