

|
Lesson 2 - CRM - Companies/Contacts In this lesson, you are going to learn about Companies and Contacts. As mentioned in Lesson 1, Companies and Contacts are the heart of the MRSware CRM system. Virtually all information is associated to Companies and Contacts. They contain information on businesses, organizations and the individuals that work for these businesses and organizations, as well as anyone with whom you have a business relationship. Relationship Management is a critical component of successful companies. Managers use a Relationship Database as a foundation to track, measure and analyze the business. With a great database, you will increase collaboration, enhance customer service and improve productivity. The better the database, the better your customer service, the better your communications, the better your chance of closing deals. Companies and Contacts is the basis for your Relationship Database. Like a garden, the better you are at preparing the soil, sowing seeds, and weeding and fertilizing, the better the crop you’ll reap. |
|
When you establish a master database of Companies and Contacts, you are preparing the soil.
Setting up standard company Categories and standard Additional information that you want to include in your database is sowing the seeds. By making sure the data in the system is up-to-date and correct, you are weeding. Asking your team for ideas and suggestions on important information to include is where you fertilize and grow your plants. As you continue to cultivate the information found in your Companies and Contacts, you will reap a first-class crop – in other words, a great Relationship Database. Today, you are going to go through each section in Companies and Contacts and learn how to add a new company or contact to your system and how to edit information already in your system |
Chapter 1
Companies
Companies contains all of the businesses and organizations with whom you interact. Whether they are your Principals, customers, prospects, vendors, or service providers they will have a company card containing all pertinent information about them. Found within the company card is every person, relationship, file, grouping, activity and extra information you and others in your company have collected and associated with that specific company.
Login to MRSware now. Once MRSware is open, click on “Companies” in the Shortcuts panel or click on the “Companies” icon on the Shortcuts Toolbar.
Companies Menu bar and Toolbar

|
When Companies opens, look at the Menu bar and the main Toolbar. Notice the changes in the options available on the Menu and Tool bars from the options available on the Home page.
|
|
|
|
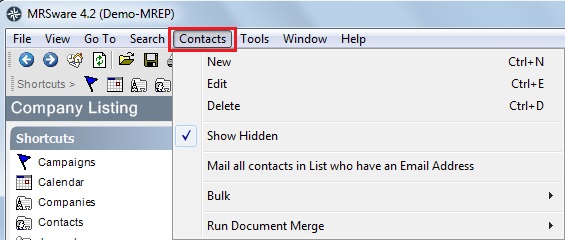
On the Menu bar, there is a new Menu option – Contacts. Click on Contacts to see the options available to you in this Menu. Show Hidden, when checked, will display all companies that are marked Hide in the Company Listing, along with those marked Private, and those with neither Hide or Private marked. Uncheck the option if you do not want to see the hidden companies. |
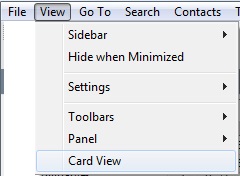
The View menu, in Companies, has a new option – Card View. Click on View → Card View to see the difference between Card View and Table View. When in Card View, you can go to the View menu and click on Table View to return to the Company listing in a table format. |

|
The main Toolbar has new icons available. Starting on the left, the first four icons are always available in MRSware. As mentioned in Lesson 1 - Home Page, the next 3 icons are available in some of the modules, including Companies. Here's a brief description of the next several icons available in Companies: The New file card icon adds a new Company The Edit file card icon edits a current Company The Delete file card icon deletes a current Company* The Contact Printout icon runs a Contact Printout Report The double cards icon drop down runs Duplicate merge Move your cursor over each icon to see their function. Then click on each one of the icons or buttons to see how they work. * the delete function will not work if something else in MRSware is linked to the company |
Chapter 2
Edit Company/Add Company
There are two types of Companies.
1 – A company already in your system – Edit Company
2 – A blank company – Add Company
Edit Company
Edit Company is a company card or window containing information that is already in your system. You access this card when you want to add to or change the information found within the current company.
There are three ways to access a current company card or the Edit Company card.
Option 1 -
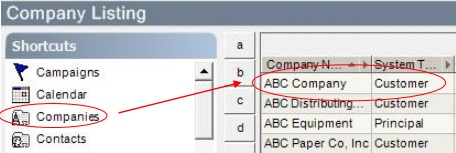
1 - Click on Companies found in the Shortcuts Panel or the Companies icon on the Shortcuts Toolbar.
2 – Wait for all of the companies in your system to load (watch the task bar for the completion of this operation).
3 - Click on the alphabet letter that begins the name of the company you’re looking for.
4 - Scroll through the company names until you find the correct company name.
5 – Double-click (or right-click and select Edit) on the correct name and their Edit Company card will open.
Option 2 -
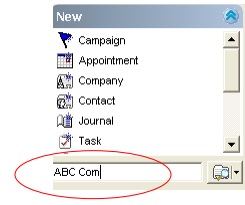
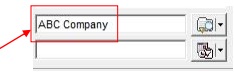
1 - Type the company name in the Quick Contact Selector found at the bottom of the Sidebar.
2 - Hit Enter on your keyboard
3 - The card or window titled Company Name: Edit Company will open.
Option 3 -
1 - Type the company name into the Search field found in the upper right-hand corner of the company table
2 - Hit Enter on your keyboard
3 - All companies with the same letters as you typed in will appear in the table
4 - Double-click (or right-click and select Edit) on the correct name and their Edit Company card will open
Let's take a look at each option and how it will work when you want to edit the company card: ABC Company has changed its fax number and you want to edit their company card.
|
Here’s an example using Option 1 to open the Edit Company card: 1 - Click on Companies in the Shortcuts Panel or the Companies icon on the Shortcuts Tool bar. 2 - Click on A (once all the companies have loaded). 3 - Scroll down until you see ABC Company 4 - Double click on ABC Company 5 - The card titled ABC Company: Edit Company will open. |
|
|
Here’s an example using Option 2 to open the Edit Company card: 1 - Type ABC Com in the Quick Contact Selector found at the bottom of the Sidebar 2 - Hit Enter on your keyboard 3 - The card titled ABC Company: Edit Company will open. Try to edit a company in your system using both options. Which option do you prefer? Is one option faster than the other? |
|
|
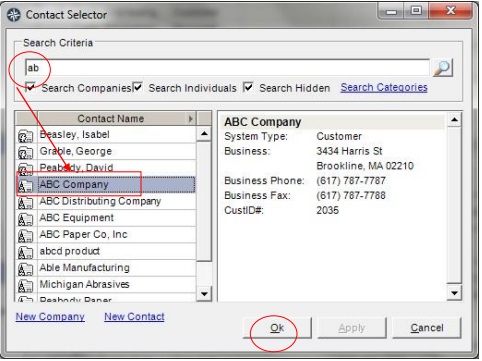
i If, when using the Quick Contact Selector, you type in a name or part of a name that has more than one choice in your system, a Contact Selector dialog box will open with a list of names that contain the letters or name you typed in to the Quick Contact Selector field. Scroll through the list and click on the appropriate name. The company will appear on the right side of the box. If it is the correct company, click Ok.
For example: If you typed AB (for ABC Company) into the Quick Contact Selector field, a Contact Selector dialog box opens, because there are a number of possibilities with the letters ab in the name. The list of possible companies or contacts that have ab in their name are listed in the dialog box. Since you want to open ABC Company: 1 - You will click on and highlight ABC Company 2 - Check the information on the right side of the box and if correct 3 - Click Ok. This will open the ABC Company: Edit Company card. |
|
Here’s an example using Option 3 to open the Edit Company card:
1 - Type the ABC into the Search field found in the upper right-hand corner of the company table 2 - Hit Enter on your keyboard 3 - All companies with the letters ABC will appear in the company table 4 - Double-click (or right-click and select Edit) on the correct name and their Edit Company card will open |

|
Regardless of the option you use to open the Company card you will edit the information the same way.
1 – Click in the field you want to edit (in our ABC Company example, you want to edit the fax number, so you will click in the Business Fax field)
2 - Make the corrections to the information shown
3 – When finished, click Save and Close
OR
3 - if you want to continue to add information to the company, click Save, which will keep the current Company card open
! Tip - Some of the other information to add may be categories, additional information, or Projects to be linked to the Company.
Add Company
The Add Company card is a blank company card waiting for you to create a new company in your system.
There are five ways to open an Add Company card.
The Add Company card is a blank company card waiting for you to create a new company in your system.
There are five ways to open an Add Company card.
|
Option 1 - 1 - Click on Company in the New Panel in the Sidebar 2 - The Add Company card opens. |

|
|
Option 2 –
1 - Click on Companies in the Shortcuts Panel or the Companies icon on the Shortcuts Toolbar. 2 - Click on the New file card icon on the main Toolbar 3 - The Add Company card opens |

|
|
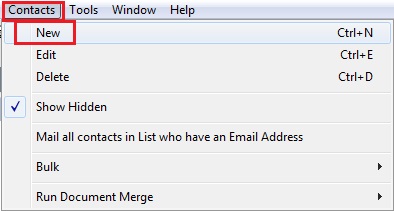
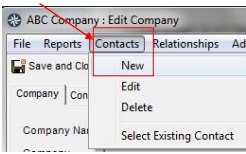
Option 3 -
1 - Click on Companies in the Shortcuts Panel or the Companies icon on the Shortcuts Toolbar. 2 – On the Menu bar, click on Contacts → New 3 - The Add Company card opens |
|
|
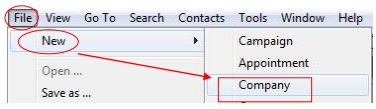
Option 4 – 1 – On the Menu bar, click on File → New → Company 2 - The Add Company card opens |
|
|
Option 5 - 1 - On the New Tool bar, click on the Create Company icon 2 - The Add Company card opens |

|
Try to open an Add Company card using all of the options shown above.
Which do you prefer?
Is one option faster than the other?
Regardless of the option you choose to open the Add Company card, the method in which you enter information is the same.
Now, open and add a new company to your database. Follow the steps below to enter information:
! Tip: Don’t forget to hit the Tab key to move from field to field.
1 – Open an Add Company card by using one of the options previously discussed.
2 – Click your cursor in the blank Company Name field.
3 - Type in the name of a company in the Company Name field.
4 - Type in the street address; hit the Enter key on your keyboard, type in the city, state and zip code***.
5 - If there is a different address for shipping, click in the circle next to Shipping and type in the street address, hit the Enter key on your keyboard, type in the city, state and zip code.
6 - Select the System Type* from the drop down list.
7 - Type the local telephone number in the Business Phone field.
8 - Type the local fax number in the Business Fax field.
9 - Click in the circle next to Business Email; click your cursor in the blank Business Email field, then type in the general company Email address in the field.
10 - Type in the company website in the Website field.
11 - Click Save and Close.
! Tip: If you want to add information to another area within the Company card, click on the disc icon to the right of Save and Close. This will save the information you have entered, but keep the new company card open for further additions. Categories, Additional information, or Projects are examples of other information to add to the Company card.
* System Type is a big picture, broad description of the Company. For instance, Customer, Prospect, Lead, Principal (or Factory, or Manufacturer) are some System Types, but Distributor, Wholesaler, Re-Distributor or OEM would be Categories, not System Types.
|
|
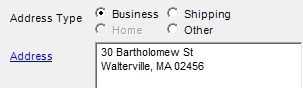
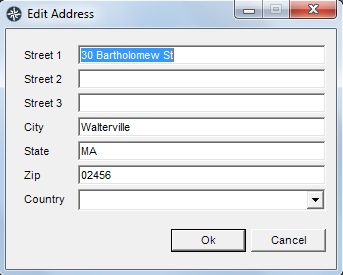
*** If you are unsure of the correct format for the address you can click on the Edit Address link shown on the left side of the Address field. |
Chapter 3
Contacts
Contacts contains all of the individuals with whom you interact. They may work for your Principals, customers, prospects, vendors, or service providers or may not be associated with a company in your system. Individuals will have a contact card containing all pertinent information about them. Found within the contact card is every relationship, file, grouping, activity and extra information you and others in your company have collected and associated with that specific contact.
Click on Contacts in the Shortcuts panel or click on the Contacts icon on the Shortcuts Toolbar.
Contacts Menu bar and Toolbar
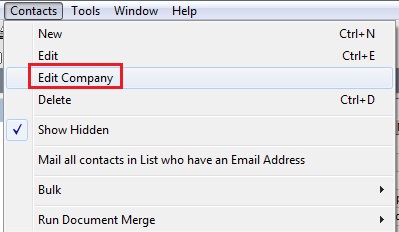
The Contacts Menu bar is essentially the same as the Companies Menu bar, with one exception - The View Menu has an additional option - Edit Company. If you are in Contacts and want to edit the company of the selected contact, you can go to the Menu bar and click on Contacts → Edit Company. This will open the contact's Company card.
Contacts
Contacts contains all of the individuals with whom you interact. They may work for your Principals, customers, prospects, vendors, or service providers or may not be associated with a company in your system. Individuals will have a contact card containing all pertinent information about them. Found within the contact card is every relationship, file, grouping, activity and extra information you and others in your company have collected and associated with that specific contact.
Click on Contacts in the Shortcuts panel or click on the Contacts icon on the Shortcuts Toolbar.
Contacts Menu bar and Toolbar
The Contacts Menu bar is essentially the same as the Companies Menu bar, with one exception - The View Menu has an additional option - Edit Company. If you are in Contacts and want to edit the company of the selected contact, you can go to the Menu bar and click on Contacts → Edit Company. This will open the contact's Company card.
The Contacts Toolbar is essentially the same as the Company Toolbar.
Chapter 4
Edit Contact/Add Contact
There are two types of Contacts:
1. A contact already in your system - Edit Contact
2. A blank contact - Add Contact
a – a new contact added from the Company card
b – a new contact
Edit Contact
Edit Contact is a contact containing information that is already in your system. You access this card when you want to add to or change the information found within the current contact.
There are three ways to access a current contact card or the Edit Contact card:
Option 1 -
1 - Click on Contacts found in the Shortcuts Panel or the Contacts icon on the Shortcuts Toolbar.
2 – Wait for all of the contacts in your system load (watch the task bar for the completion of this operation).
3 - Click on the alphabet letter that begins the name of the contact you’re looking for.
4 - Scroll through the contact names until you find the correct contact name.
5 – Double-click on the correct name and their Edit Contact card will open.
Option 2 -
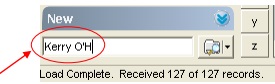
1 - Type the individual’s name in the Quick Contact Selector found at the bottom of the Sidebar.
2 - Hit Enter on your keyboard
3 - The card titled Name Edit Contact will open.
Option 3 -
1 – Open the Company card that contains the contact’s name (the company with whom the contact works)
2 – Click on the Contacts tab
3 – Double click on the contact’s name to open the Edit Contact card
Kerry O’Hair has changed his cell phone number and you want to edit his Contact card.
|
Here’s an example using Option 1 to open the Edit Contact card:
1 - Click on Contacts in the Shortcuts Panel or the Contacts icon on the Shortcuts Toolbar. 2 - Click on O (once all the contacts have loaded). 3 - Scroll down until you see O’Hair, Kerry. 4 - Double click on O’Hair, Kerry. 5 - The card titled O’Hair, Kerry: Edit Contact will open. |

|
|
Here’s an example using Option 2 to open the Edit Contact card: 1 - Type Kerry O’H in the Quick Contact Selector found at the bottom of the Sidebar 2 - Hit Enter on your keyboard 3 - The card titled O’Hair, Kerry: Edit Contact will open. |
|
|
Here’s an example using Option 3 to open the Edit Contact card: 1 – Type ABC Company in the Quick Contact Selector found at the bottom of the Sidebar 2 – Hit Enter on your keyboard 3 – The card titled ABC Company: Edit Company will open. 4 – Click on the Contacts tab 5 – Highlight Kerry O’Hair’s name 6 – Double click on his name and the card titled O’Hair, Kerry: Edit Contact will open |
|
Try to edit a contact in your system using all the options.
Which option did you prefer?
Which option is easier to use and saves you time while you work?
Regardless of the option you use to open the Contact card you will edit the information the same way.
1 – Click in the field you want to edit (in our Kerry O’Hair example, you want to edit his cell phone number, so you will click in the Mobile Phone field
2 - Make the corrections to the information shown
3 – When finished, click Save and Close
OR
3 - If you want to continue to add information to the contact, click Save, which will keep the current Contact card open.
! Tip - Some of the other information to add may be categories, additional information, or Projects to be linked to the Contact card.
Add Contact
The Add Contact card is a blank contact card waiting for you to create a new contact in your system.
There are six ways to open an Add Contact window.
The Add Contact card is a blank contact card waiting for you to create a new contact in your system.
There are six ways to open an Add Contact window.
|
Option 1 – 1 - Open a current Company in your system using one of the options listed above. 2 - Click on the Contacts Tab. 3 - Click on New 4 - The Add Contact card opens. |
|
|
Option 2 - 1 - Click on Contact in the New Panel in the Sidebar 2 - The Add Contact card opens. |

|
|
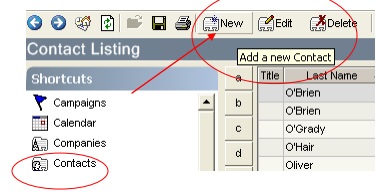
Option 3 - 1 – Click on Contacts in the Shortcuts Panel or the Contacts icon on the Shortcuts Toolbar. 2 – Click on the New file card icon on the main Toolbar 3 – The Add Contact card opens. |
|
|
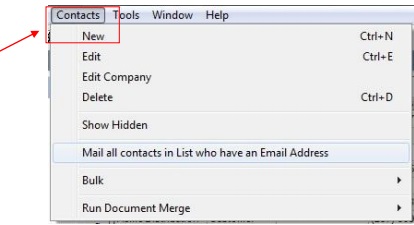
Option 4 – 1 – Click on Contacts in the Shortcuts Panel or the Contacts icon on the Shortcuts Toolbar. 2 – Click on Contact → New on the Menu bar 3 – The Add Contact card opens. |
|
|
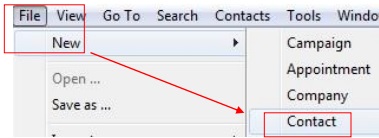
Option 5 - 1 – Click on File → New → Contact on the Menu Bar 2 – The Add Contact card opens. |
|
|
Option 6 - 1 – On the New Tool bar, click on the Create New Contact icon 2 – The Add Contact card will open. |

|
Try to open an Add Contact card using all of the options shown above.
Which do you prefer?
Is one option faster than the other?
Regardless of the option you choose to open the Add Contact card, the method in which you enter information is the same.
i When you open an Add Contact card from a Company card already in your system, some of the fields are already filled in. If the information in the address field or phone and fax fields is different, you can use the Tab key to move to those areas and replace the data with the correct information.
Now, open and add a new contact to your database. Follow the steps below to enter information.
! Tip: Don’t forget to hit the Tab key to move from field to field.
1 - Open an Add Contact card by using one of the options previously discussed.
2 - Click your cursor in the blank Contact Name field.
3 - Type in the name of an individual in the Contact Name field.
4 - Type in the individual’s title in the Job Title field.
5 - Check either the Private or Hide box if the individual is personal and you don’t want anyone else in your company to see this person in their Contact listing.
6 - If the Business address is different, type in a new street address, hit the Enter key on your keyboard, type in the city, state and zip code.
7 - If you know the home address of the individual, click in the circle next to Home and type in the street address; hit the Enter key on your keyboard, type in the city, state and zip code.
8 - Select the System Type* from the drop down list.
9 - Type the local telephone number in the Business Phone field.
10 - Type the local fax number in the Business Fax field.
11 - Type in a home telephone number (if known) in the Home Phone field.
12 - Type in a cell phone number (if known) in the Mobile Phone field.
13 - Click in the circle next to Business Email, click your cursor in the blank Business Email field, and type in the individual’s address.
14 – Click in the circle next to Personal Email (if known), click your cursor in the blank Personal Email field, and type in the address
15 - Type in the company website in the Website field.
16 - Enter the individual’s birthday, if known.
17 - Click on Save and Close.
! Tip: If you want to add information to another area within the Contact card, click on the disc icon to the right of Save and Close. This will save the information you have entered, but keep the new contact card open for further additions. Categories, Additional information, or Projects are examples of other information to add to the Contact card.
* System Type is a big picture, broad description of the Contact. For instance, Customer, Prospect, Lead, Principal, Rep are some System Types, but Distributor, Wholesaler, Re-Distributor or OEM would be Categories, not System Types.
Chapter 5
The Company/Contact Card Title bar, Menu bar, Toolbar and the Tabs
Up to now, when you edit information or add a new company or contact, the main page of the card displays. The main page shows general information usually found on a paper file card in a “Rolodex” type system. This includes names, physical addresses, phone and fax numbers, e-mail addresses and websites.
When you’re building a Relationship Database, you want your Company and Contact cards to contain much more information. You will use the Menu bar, Toolbar, and Tabs in your company and contact cards for additional information, to track activities, search groups, plan sales calls, maintain personal information, and much more.
T

|
Title bar - At the top of any of the Company or Contact cards you will see the Title bar with the name of the card or window -
For example: ABC Company: Edit Company or Add Company, etc. |

|
Menu bar - Under the Title bar, is the Menu bar – the menus from left to right are:
File, Reports, Contacts, Relationships, Additional, Files, Activity and Tools. Each Menu option has a drop down list which allows you to perform another action. Take the time now to click on each option on the Menu bar and view the drop down lists and the options available to you. |

|
Toolbar - Under the Menu bar, is the Toolbar (sometimes called the Button bar) – the icons from left to right are:
Save and Close, Save, Save and New (grayed out), Delete, Run Contact Printout Report, Add new contact relationship, Add a new additional info, New Appointment, New Journal, New Task, Search for Email activity, Search for Invoice Activity, Refresh Activity List, Spell check, Search for address in Google maps, Send as VCard. These icons are short cuts to other windows or dialog boxes within the CRM application. Take the time now to click on each of the icons or buttons. Each icon will open another window or dialog box allowing you to save time and add more information to your Relationship Database. i Although the Search for Activity icon appears in the Toolbar of the Contact card, there is no invoice activity for a contact. |


|
Tabs - Under the Toolbar, is a series of tabs. The tabs open to other pages within the Company or Contact cards.
The top image shows the Tabs In the Company card - Company, Contacts, Relationships, Files, Categories, Additional, and Activity The bottom image shows the Tabs in the Contact card - Contact, Relationships, Files, Categories, Additional, and Activity |
Here is a brief description of each of the tabs in the Company and Contact cards:
Company: This tab displays the main page of the Add Company or Edit Company card. This page displays the name, whether the company is a private or hidden company, address - business, shipping, and other, System Type, telephone and fax numbers, e-mail and website addresses. There is a Notes section in the middle of the page, and at the bottom of the page is the Projects field, where you link projects to the company.
i This tab only appears in an Add Company or Edit Company card (see image above)
Contacts: In the Company card, this tab opens to the list of individuals who work for the company. You are able to view the first and last name of the individual, as well as their job title, business and mobile phone numbers and their email addresses.
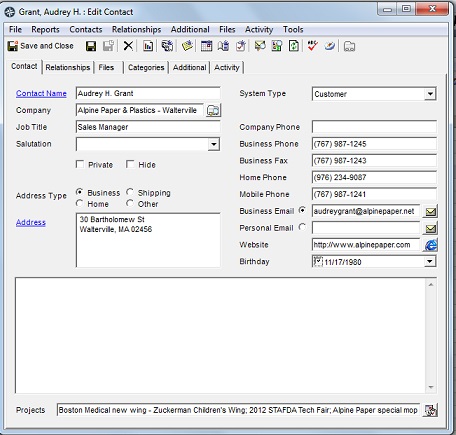
Contact: In the Contact card, this tab is the main tab and displays the main page of the Add Contact or Edit Contact card. Shown on this page is the name of the contact, the name of the company for whom they work, job title, whether the contact is a private or hidden contact, address - business, shipping, home, and other, System Type, telephone and fax numbers, home and mobile phone numbers, e-mail and website addresses, and their birthday (if known). There is a Notes section in the middle of the page, and at the bottom of the page is the Projects field, where you link projects to the contact.
Relationships: This tab has different meanings depending on whether you're in the company card or the contact card. It opens to a list of companies and contacts that our related personally or through business. You can also view how the company or contact is related and any notes you may add to the system.
For example, in one of your customer’s Company cards, you may list manufacturers you represent from whom they buy and then enter the product discounts they receive. In one of your customer's Contact cards, you may list the individuals within the company to whom they are related (father, son, daughter, etc).
Files: This tab opens to a list of files that are related to the company or contact. For example, in a Company card the files can be quotes or new credit applications. In a Contact card the files can be articles written by the individual.
Categories: This tab opens to a list, which you create, so you can group companies and contacts for searching and filtering. For example, you may include buying groups, industry markets, type of companies and contacts, titles, etc. Once you have created your groups, you can use Search, on the Menu bar, to filter your lists, and then send out bulk marketing messages, export lists for document merges and more.
Additional: This tab opens to a list of data that has no other pre-set field in MRSware, such as personal information that may create a bond between a company or contact and your company. Examples of additional information may be family names, pets, college names, awards, hobbies, when or how to get in touch with the company or contact, etc.
Activity: This tab opens to a list of all interactions with the company or contact. You are able to view any Journals, Tasks, Appointments, Campaigns, Opportunities, Expenses and, if you use MRSware for your e-mail, all messages sent to or received from this company or contact.
Click on each tab in a Company and Contact card within your system to view the information available.
Company: This tab displays the main page of the Add Company or Edit Company card. This page displays the name, whether the company is a private or hidden company, address - business, shipping, and other, System Type, telephone and fax numbers, e-mail and website addresses. There is a Notes section in the middle of the page, and at the bottom of the page is the Projects field, where you link projects to the company.
i This tab only appears in an Add Company or Edit Company card (see image above)
Contacts: In the Company card, this tab opens to the list of individuals who work for the company. You are able to view the first and last name of the individual, as well as their job title, business and mobile phone numbers and their email addresses.
Contact: In the Contact card, this tab is the main tab and displays the main page of the Add Contact or Edit Contact card. Shown on this page is the name of the contact, the name of the company for whom they work, job title, whether the contact is a private or hidden contact, address - business, shipping, home, and other, System Type, telephone and fax numbers, home and mobile phone numbers, e-mail and website addresses, and their birthday (if known). There is a Notes section in the middle of the page, and at the bottom of the page is the Projects field, where you link projects to the contact.
Relationships: This tab has different meanings depending on whether you're in the company card or the contact card. It opens to a list of companies and contacts that our related personally or through business. You can also view how the company or contact is related and any notes you may add to the system.
For example, in one of your customer’s Company cards, you may list manufacturers you represent from whom they buy and then enter the product discounts they receive. In one of your customer's Contact cards, you may list the individuals within the company to whom they are related (father, son, daughter, etc).
Files: This tab opens to a list of files that are related to the company or contact. For example, in a Company card the files can be quotes or new credit applications. In a Contact card the files can be articles written by the individual.
Categories: This tab opens to a list, which you create, so you can group companies and contacts for searching and filtering. For example, you may include buying groups, industry markets, type of companies and contacts, titles, etc. Once you have created your groups, you can use Search, on the Menu bar, to filter your lists, and then send out bulk marketing messages, export lists for document merges and more.
Additional: This tab opens to a list of data that has no other pre-set field in MRSware, such as personal information that may create a bond between a company or contact and your company. Examples of additional information may be family names, pets, college names, awards, hobbies, when or how to get in touch with the company or contact, etc.
Activity: This tab opens to a list of all interactions with the company or contact. You are able to view any Journals, Tasks, Appointments, Campaigns, Opportunities, Expenses and, if you use MRSware for your e-mail, all messages sent to or received from this company or contact.
Click on each tab in a Company and Contact card within your system to view the information available.
Chapter 6
Final Thoughts
Now that you can add a new company or contact and edit or update a current company or contact, you can begin to build your Relationship Database. This is the foundation for your success. You’ll have the information you need to plan your sales calls, make a connection with your customer, prospect or Principal, and share information with other members of your sales team in order to provide superior customer service.
When you feel you fully understand the information, take the quiz.