|
Lesson 7 – MREPs - Customers With this lesson, we begin to learn about MRSware’s MREPS modules. As multi-line sales reps know, synergy between their lines is a powerful tool in selling. MRSware creates synergy by integrating CRM and MREPS. Individually, CRM and MREPS contain helpful information, but when integrated into a single system, they become greater than the sum of their individual parts. MRSware provides a complete picture of your customers; not just bits and pieces of data. |
MREPS is made up of Customers, Invoice Entry, Order Entry, Payment Entry, Product Catalog, and Sales Rep Management. Another valuable piece of the puzzle is reporting and analytics. Future lessons will cover these subjects.
MREPs contains the business functions for tracking and reporting on the financial data of the rep agency. Because of the sensitive nature of this information, MRSware includes a variety of permissions to protect the disclosure of the data. You will not be learning about permissions in this lesson; however I mention them because what the User sees in MREPS is determined by their User Roles and Permissions.
In this lesson, you are going to learn about Customers. MRSware is unique in that it breaks Companies, Contacts, and Customers into separate sections.
As you learned in Lesson 2, Companies and Contacts, which are the heart of the MRSware CRM system, may include your Customers as well as Competitors, Principals, End Users, Vendors, and Others. Companies contains the profile and activity information for any business entity entered in your system.
Customers includes only the companies that have purchased a product from your Principals. Customers shows information regarding the sale of a product and the commission dollars earned as a result of the sale.
For this lesson, you will learn that Customers shows the results of your sales activities. With the tools available in MRSware you will sort and filter the data to find the answers to these questions - who are your best customers, how many Principals does a customer buy from, who are all the customers in a specific state or city or zip code, how do sales compare over a specific period of time, when was the customer last contacted by someone in your company, and many more.
Today, you are going to go through each section of Customers and learn how to edit a current customer or add a new customer to your system, the types of views in the Customer table, and how to sort and filter the information once it’s in the system.
Chapter 1
Customers
Customers contains all of the companies that purchase products from any of your Principals. A sales rep or territory is assigned to a customer. The individuals who are assigned to a customer can view the information found in the Customers table.
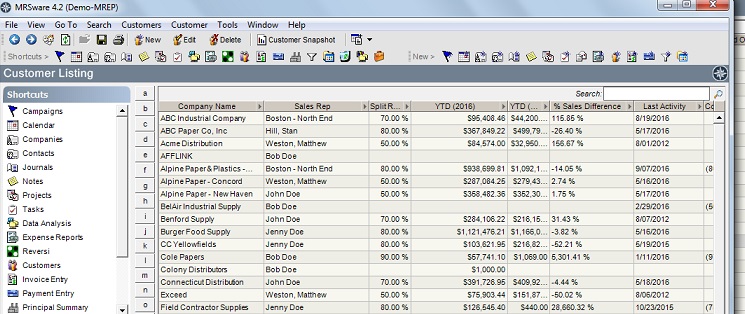
The Customers table displays every customer, the sales rep or territory assigned to the customer, the sales and comparison of the sales, the percentage of difference in sales shown in the comparison, the commission split rate, the date of the last activity associated with the customer, and the company profile information.
Login to MRSware now. Once MRSware is open, click on Customers in the Shortcuts panel or click on the Customers icon on the Shortcuts Tool bar.
Customers Menu bar and Toolbar
When Customers opens, look at the Menu bar and the main Toolbar. Notice the changes in the options available on the Menu and Toolbars from the options available in other areas of MRSware.
The Menu bar has two new Menu options – Customers and Customer.
|
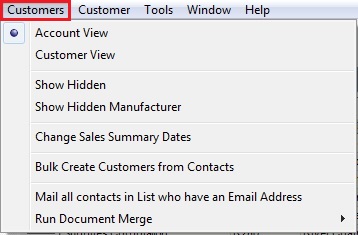
Please click Customers, on the Menu bar to see the options available to you in this Menu.
The Customers menu gives you access to display your customers in the Customer Listing two different ways, choose to hide or show your customers or your manufacturers, change the dates for your sales numbers, create new customers from companies in bulk, send bulk email to customers, and run a document merge for a mailing. Did you notice there are two views in the Customers menu? 1. Customer view 2. Account view |
Please click Customer on the Menu bar to see the options available to you in this Menu
The Customer menu gives you access to add a new customer, edit a current customer, delete a customer, edit a company in your system, and run a Customer Snapshot report. |
Customer View
Customer view displays a sales dollar total amount for all manufacturers from whom a customer buys.
In the example below Alpine Paper & Plastics - Walterville branch, purchased a total of $938,699.81 YTD 2016. This is the sum of all lines purchased by Alpine Paper & Plastics.
In addition to the Company name and YTD 2016 sales total, the Customer view displays the name of the Sales Rep, the Split Rate assigned to them, YTD 2015 sales total, % Sales Difference between the two years, and the Last Activity associated with this company. The ensuing columns (not shown) display address, phone, e-mail, website information, along with notes.
Account View
Account view displays a sales dollar total amount for each manufacturer from whom a customer buys.
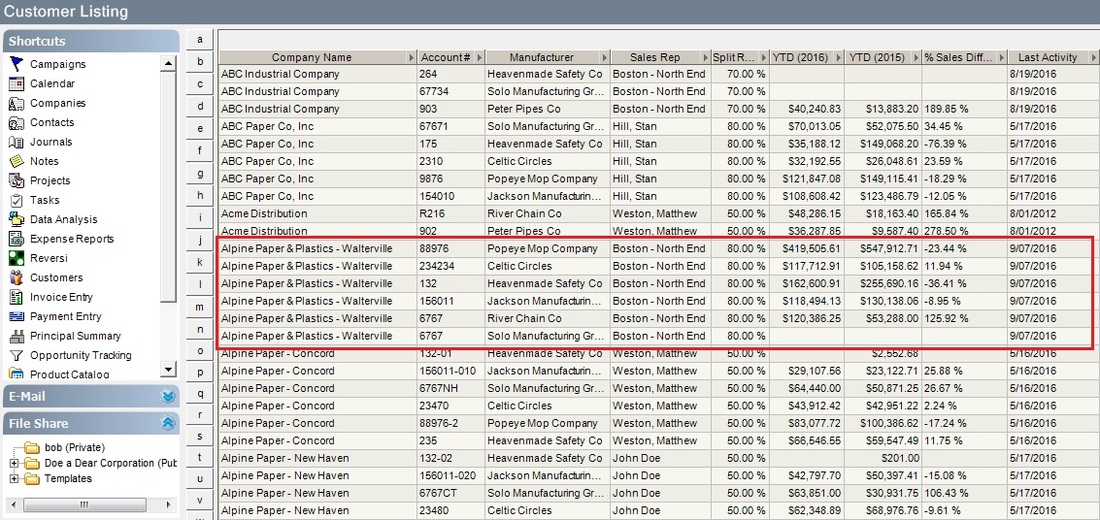
In the example below Alpine Paper & Plastics - Walterville branch, purchased from 6 different manufacturers YTD 2016. The sales dollar shown is the purchases for each manufacturer.
In addition to the Company name and YTD 2016 sales total by Manufacturer, the Account view displays the name of the Account # by manufacturer, Sales Rep, the Split Rate assigned to them, YTD 2015 sales total, % Sales Difference between the two years, and the Last Activity associated with this company. The ensuing columns (not shown) display address, phone, e-mail, website information, along with notes.
i In order to use the Account view, the Customer must have entered in the system, an account number for each manufacturer.
|
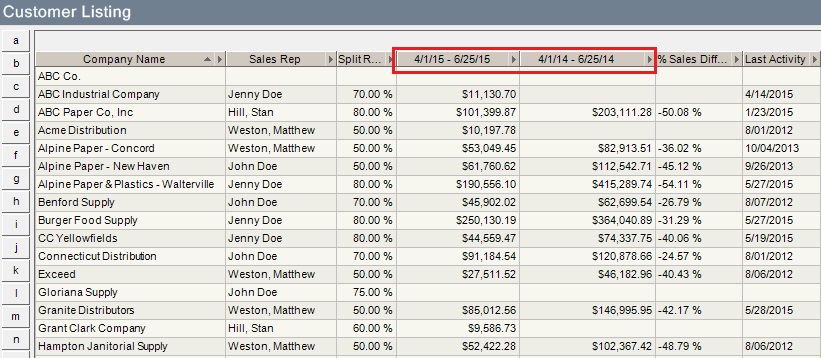
There is also an option in the Customers menu to Change Sales Summary Dates. Click on Change Sales Summary Dates to choose a time frame to compare sales. The default setting is This Year to Date vs Last Year to Date. You can save the date range by checking the box below each Sales Summary Date Range - Save Date Range in Preferences The Customer Listing table will display, in the column headers, the new dates set in the Date Range dialog. |
The Customers Toolbar has two new buttons available. Move your cursor over each icon to see what their function is. Then click on each of the buttons available to you.
Did you notice, like similar Toolbars throughout MRSware, you can add a new Customer, edit a Customer already in the system, or delete a Customer already in the system?
Did you notice the new icons on the Toolbar – Customer Snapshot and Run Document Merge?
Did you notice, like similar Toolbars throughout MRSware, you can add a new Customer, edit a Customer already in the system, or delete a Customer already in the system?
Did you notice the new icons on the Toolbar – Customer Snapshot and Run Document Merge?
|
The Customer Snapshot, available in the Customer Menu and the main Toolbar.
To run the Customer Snapshot from either the Customer Menu or Toolbar: 1. Right-click on a Customer in the Customer listing table 2. Click on Customer Snapshot 3. Select the date range in the Report Prompt Customer Snapshot 4. Click Ok To run the Customer Snapshot from the Edit Customer dialog: 1. Right-click on a Customer in the Customer listing table 2. Click on Reports -> Customer Snapshot in the Edit Customer dialog. 3. Select the date range in the Report Prompt Customer Snapshot 4. Click Ok. i You must select a customer before you can click on and run a Customer Snapshot. |
Chapter 2
Edit Customer/Add Customer
There are two Customers dialogs.
1 – A customer already in your system – Edit Customer
2 – A blank customer – Add Customer
Edit Customer
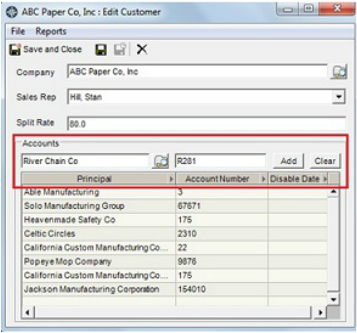
Edit Customer displays the customer name, sales rep/territory assigned to the customer, the commission split (if applicable), and the names of the Principals and account numbers from whom the customer buys.
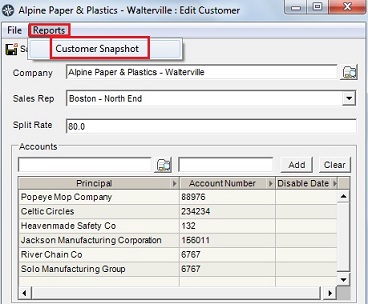
The Edit Customer dialog is used to change the sales rep assignment, commission split rate, an account number for a Principal, or to add a new Principal.
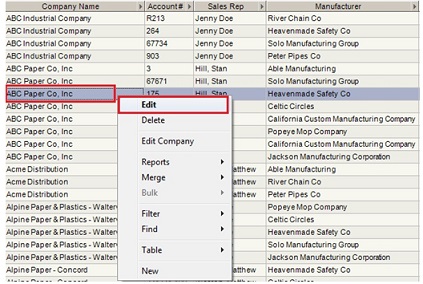
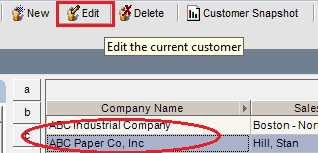
There are three ways to access a current customer or the Edit Customer dialog:
Option 3 -
1. Highlight the customer
2. Double-click to open Edit Customer dialog.
1. Highlight the customer
2. Double-click to open Edit Customer dialog.
|
To add a new Principal to a customer: 1. Click in the first field below Accounts 2. Type in part of the name of a new Principal, such as Riv 3. Click the Tab key on your keyboard and the Principal’s name auto-fills. 4. Click the Tab key again to move to the next field 5. Type in the customer’s account number for this Principal. 6. Click Add. 7. If you are done editing, click Save and Close. OR 7. If you want to make other changes, click the Save button. This will keep the current Edit Customer dialog open for reference or for further additions or changes. |
Add Customer
Add Customer opens a blank customer dialog waiting for you to create a new customer in your system. (Figure 16)
The Add Customer dialog is used to create a new customer, assign a sales rep to the customer, assign a split rate, and add new Principals with account numbers.
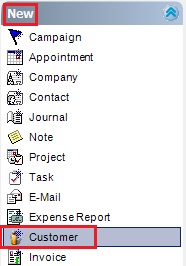
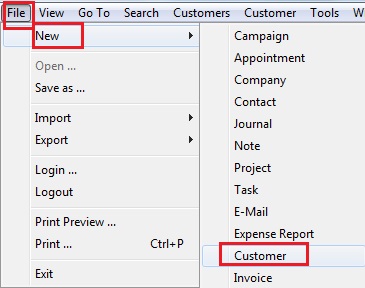
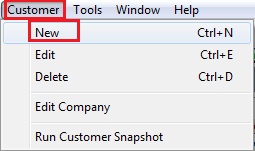
There are seven ways to add a new customer:
Open an “Add Customer” dialog using all of the options shown above.
Which do you prefer? Is one option faster than the other? Will one option save you time?
Regardless of the option you choose to open the Add Customer dialog, the method in which you enter information is the same.
Now, open and add a new customer to your database. Follow the steps below to enter information:
! Tip: Don’t forget to hit the Tab key to move from field to field.
1 – Open an Add Customer dialog by using one of the options previously discussed.
2 – Click your cursor in the blank Company field.
3 - Type in the name of a customer in Company field.
4 – Tab to the Sales Rep field and click on the down arrow to select the Sales Rep name.
5 – Tab to the Split Rate field and enter the percentage of the commission that the Sales Rep will receive
6 – Tab to the Accounts field and type in the name of the Principal from whom the customer is buying
7 – Tab to the Account Number field and type in the account number
8 – Tab again and click Add
9 – Click Save and Close.
OR
9 - If you want to add another Principal before closing, click Save (the disc icon to the right of Save and Close). This will save the information you have entered, but keep the dialog open for further additions.
i There must be a corresponding company in MRSware in order to create a new customer. If, when you type in the name of a new customer in the Company field in the Add Customer dialog, you see a red squiggly line under the company name, this indicates there is no corresponding company in the system. If this is the case, you must add a new customer.
|
You can add a new company to MRSware, from the Add Customer dialog, by clicking on the file button at the end of the Company field and selecting New Company. You will type in the information in the Add Company window (see instructions in Lesson 2 – CRM, Companies/Contacts). i You can also edit the company information by clicking on the file button at the end of the Company field and selecting Edit. i The instructions shown above are for adding customers one at a time. |
|
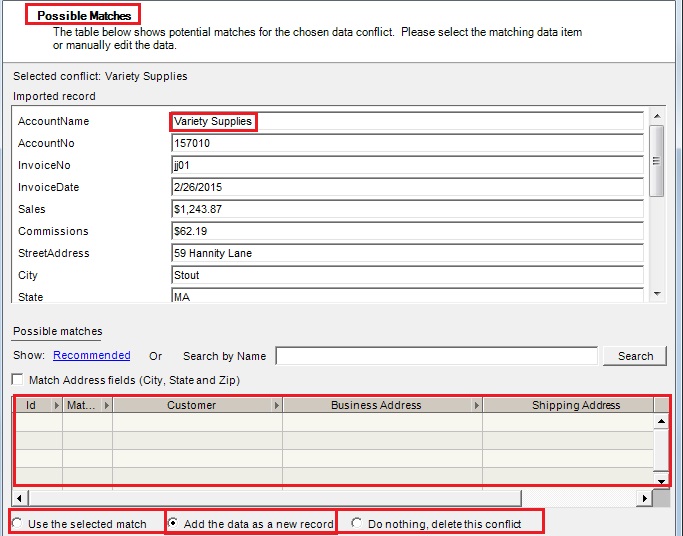
The last two ways to add a new customer are:
Option 6 - During Conflict Resolution after an import of invoices using the Import Invoice Wizard, you can select the option Add the data as a new record when no matching customer is found. When you choose Add the data as a new record, a new company is created. i All fields that are in the import file (and mapped) are added to the new company, such as: street address, city, state, zip, business phone, etc. i In the Add Customer dialog, only the main entry (the Company field) and the account number (if in the import file) are added to the Add Customer dialog. A Sales Rep is not assigned, nor is the Split Rate entered. |
|
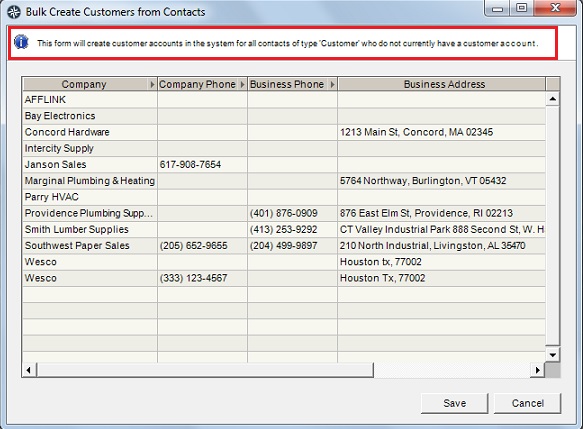
Option 2 - Add new customers in bulk using the Customers menu option Customers -> Bulk Create Customers from Contacts. 1. Click on Bulk Create Customer from Contacts in the Customers menu. The Bulk Create Customers from Contacts window opens. The customers shown in the window have not yet been added to your system as a customer. They may be in your Companies list and the System Type may show Customer, but Customers need to be added not only to the Companies listing, but also to the Customers listing. With this option you can add them in bulk. 2. Click Save. i You do not have to select any of the companies in the table. |
Chapter 3
The Customer Title bar, Menu bar, and Toolbar
By now, if you’ve gone thru some of the other Lessons, you’ve learned about the Title bar, the Menu bar, and the Toolbar. The Edit Customer and Add Customer dialogs have very simple Menu and Toolbars.
Did you notice there are no tabs?
The Customer Title bar, Menu bar, and Toolbar
By now, if you’ve gone thru some of the other Lessons, you’ve learned about the Title bar, the Menu bar, and the Toolbar. The Edit Customer and Add Customer dialogs have very simple Menu and Toolbars.
Did you notice there are no tabs?
|
Menu bar
Under the Title bar, is the Menu bar – the menus from left to right are: File, and Reports Each Menu option has a drop down list which allows you to perform another action. Take the time now to click on each option on the Menu bar and view the drop down lists and the options available to you. |
|
Toolbar
Under the Menu bar, is the Toolbar – the icons from left to right are: Save and Close, Save, Save and New (grayed out), and Delete. These icons are short cuts to perform actions in the dialog. Take the time now to click on each of the icons. Each icon will complete an action in the dialog. |
Chapter 4
Customer Listing
In order to view your customers, open the Customer Listing. Click on either Customers in the Shortcuts panel or the Customers icon on the New Toolbar.
i The default view will be the Customer View.
The table provides sorting and filtering options.
Here are a few reasons to sort and filter:
- Working with a manufacturer
- Who are their customers?
- Are sales up or down for each customer?
- Who are their largest customers?
- Who isn’t buying from them, but is a prospect?
- Planning a sales trip out of town
- Who are the customers in the area?
- Who is up or down for the year?
- Who are the top customers?
- Who are the prospects in the area?
- What manufacturers need to be promoted?
|
To sort on a column header:
1. Click on the right-facing arrow at the top of the columns to sort by column 2. Select Sort -> Descending The table shows the YTD (2015) column sorted in descending order or Top, down. |
To filter by selection:
1. Right-click on a state in the Business State column 2. Select Filter by Selection The table only shows the customers located in the selected state in the Business State column. |
Now try sorting and filtering in the Accounts view. Try to filter by the manufacturer and then sort descending. What do you see?
You should see a list of all the customers who buy from one manufacturer, sorted from the top down, showing you who the customers are that buy the most from the manufacturer.
Try sorting and filtering to see what other uses you have for the Customer Table.
* Customer Snapshot
In Chapter 1 of this lesson, the Customer Snapshot button was briefly mentioned. We discussed where it could be found:
1. On the Customers main Toolbar.
2. As an option in the Customer menu
3. As an option in the Edit Customer Reports menu
i Remember, you must select a customer before you can click on and run a Customer Snapshot.
When clicked, a report prompt opens offering options for report information.
1. Select the date range
2. Uncheck the boxes next to the names of the information you do not want to appear
3. Click Ok
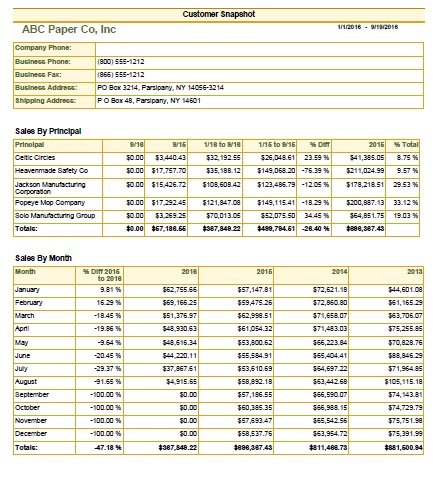
The Customer Snapshot report opens showing the sales for all Principals from whom the customer is buying. The sales are compared to the previous year’s month and the previous year to date. There is also a section showing up to 4 years on monthly comparisons.
This report is often used by sales reps for call planning. When combined with the Contact Printout Report (Lesson 2 – CRM – Companies/Contacts) the sales rep sees not only the sales history, but the activities that have taken place. The two reports make it very easy for sales reps to focus their sales efforts where they are most needed.
The Customer Snapshot for ABC Paper Co, Inc, is shown below. I have unchecked several boxes in the Report Prompt in order to show the sales information.
Run a Customer Snapshot Report leaving all of the boxes checked to see the options available to you.
Chapter 5
Final Thoughts
With the synergy created by integrating sales data found in the Customer Listing with the sales activities found in Companies/Contacts, you can complete your customer’s picture. You now have the ability to focus and plan your sales efforts.
In a single, shared system you and your associates have the activities and numbers showing you what has worked in the past and what needs to be done in the future to ensure continual growth, while enhancing customer service to all businesses with whom you interact.
When you feel you fully understand the information, take the quiz.
Lesson 7 Quiz - MREPS - Customers
This quiz is designed as a multiple choice format. When you have completed the quiz, enter your name and e-mail address, then click Submit Answers. You will receive an e-mail response with the correct answers.
Good luck.
This quiz is designed as a multiple choice format. When you have completed the quiz, enter your name and e-mail address, then click Submit Answers. You will receive an e-mail response with the correct answers.
Good luck.
