It's always a good idea to review and update categories, labels, types, and process steps. Some of the reasons for updating categories could be:
- cleaning up duplicate categories such as - sales meeting and sales training, or sales call and presentation, or ride-with or work-with, or many other categories that could mean the same thing to different reps
- adding a prefix to a long list of categories in order to make it easier to find specific entries - BG:: Embassy Group; BG:: NISSCO; BG::SSS; BG::WIT & Co. If you listed the buying groups without a prefix they would be listed alphabetically throughout your list, but with a prefix they are all together and much easier to find in your categories list
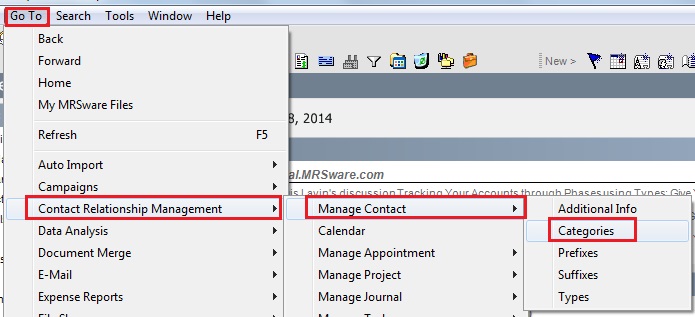
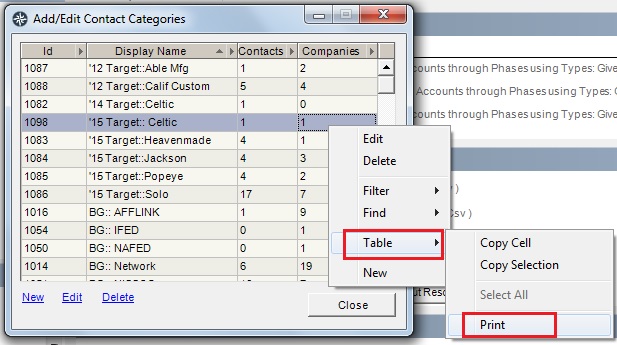
The first step is to look at your current categories to review them. There are two options if you want to print out a list. Option 1 from the MRSware desktop client and Option 2 from MRSweb CRM 2 web client.
1 - On the Menu bar, click on Go To → Contact Relationship Management → Manage Contact → Categories
2 - When the Add/Edit Categories dialog opens, right-click in the dialog box and select Table → Print
If you decide to delete any of the "duplicates" as shown above to be more consistent, read how to do this:
Removing Unwanted Categories in Bulk
You can also review, edit, or add to any of the category lists in MRSware - Appointments, Journals, Tasks, Projects, File Share, Expense Reports, or Campaigns.
Here are the areas in MRSware you can customize (manage) for your company:
Campaigns: Attendee Types, Campaign Categories, Campaign Types
Contact: Additional Info, Categories, Prefixes, Suffixes, Types
Appointment: Categories, Internet Calendar, Labels, Types
Journal: Categories, Types
Project: Categories, Types
Tasks: Categories, Status, Types
Contact Relationship (this list is found in the Relationship tab in Companies/Contacts): Types
Expense Reports: Categories, Types
File Share: Categories
Opportunity Tracking: Close Reasons, Sales Opportunity Types, Sales Phases
Order Management: Product Types
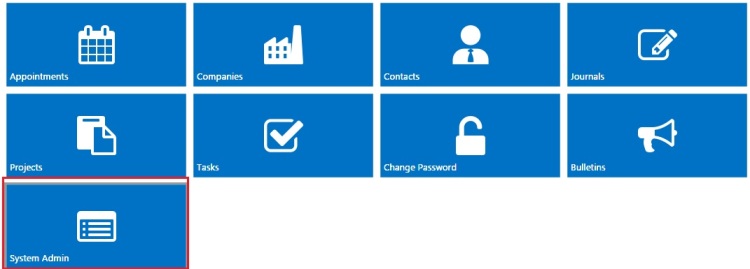
Option 2 - MRSweb CRM 2 web client:
1 - On the Home page, tap on "System Administration"
2 - In System Administration, tap on "Categories"
3 - When the categories page opens, tab on your web browser's "Print" button


 RSS Feed